> ## Documentation Index
> Fetch the complete documentation index at: https://docs.interactly.ai/llms.txt
> Use this file to discover all available pages before exploring further.
# Single-Modal Campaign
> Learn how to set up, launch, and manage single-modal campaigns for voice-only automated phone calls with AI assistants
# About
Single-modal campaigns provide a streamlined, voice-only communication channel for automated phone calls. These campaigns focus exclusively on direct voice interactions with your AI assistant, making them perfect for appointment reminders, quick surveys, confirmations, and simple outreach scenarios.
Single-modal campaigns are ideal when you only need voice interactions. For campaigns requiring SMS notifications or follow-up messages, explore [Multi-Modal Campaigns](/campaigns/multi-modal-campaign).
## What Makes It Single-Modal?
Single-modal campaigns are designed for **voice interactions only**:
* ✅ Direct phone calls to contacts
* ✅ AI assistant-powered conversations
* ✅ Real-time call processing
* ✅ Call outcome tracking
* ❌ No pre-call SMS notifications
* ❌ No post-call messaging
* ❌ No text-based interactions
## When to Use Single-Modal Campaigns
* **Appointment reminders**: Simple voice confirmations
* **Quick surveys**: Voice-based data collection
* **Service confirmations**: Order status or delivery updates
* **Simple notifications**: Payment reminders or alerts
* **Customer service**: Direct voice support outreach
* **Streamlined setup**: Focus only on voice configuration
* **Cost-effective**: No SMS costs or complexity
* **Quick deployment**: Faster to configure and launch
* **Clear workflow**: Single communication channel
* **Higher completion rates**: Direct voice engagement
## Creating Your Single-Modal Campaign
1. Navigate to your Interactly dashboard
2. Click the **Campaigns** tab
3. Select **New Campaign** to begin
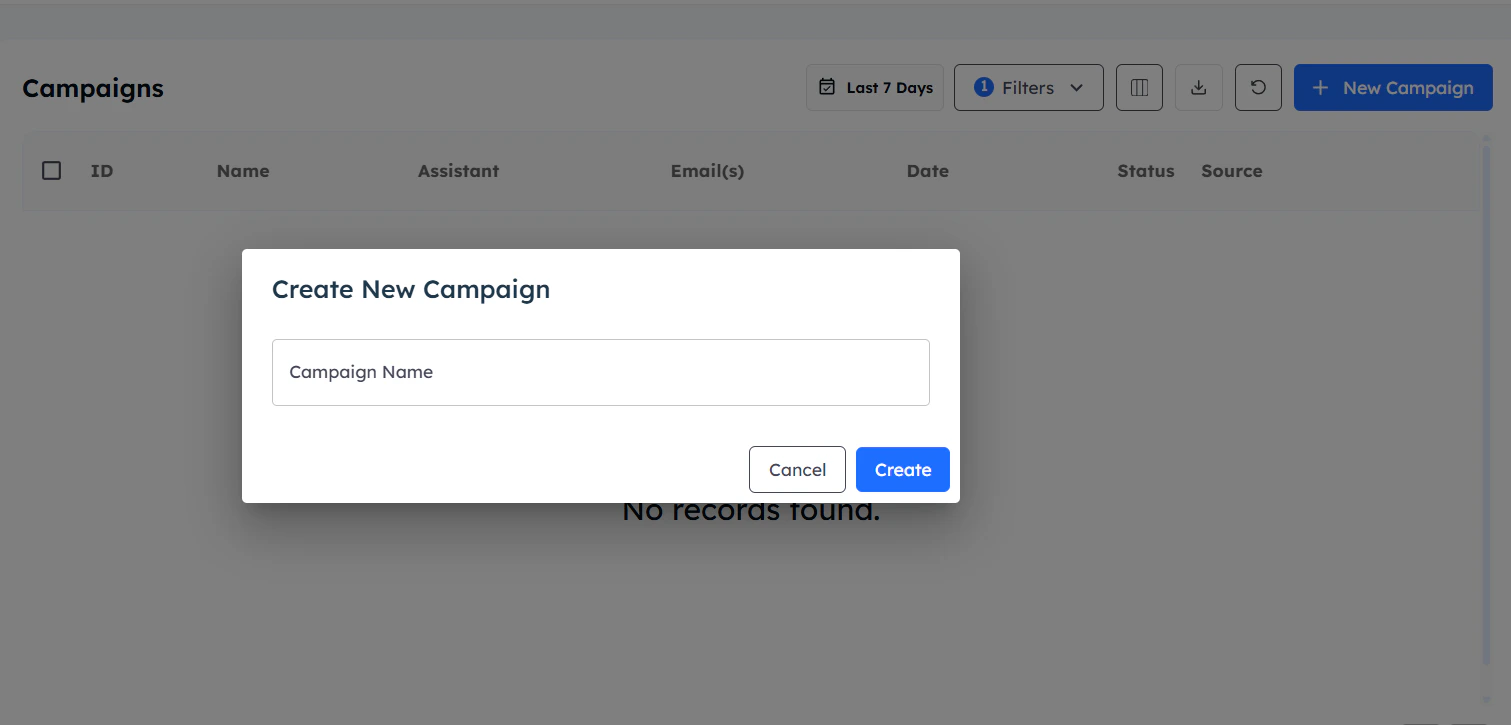 Enter a descriptive campaign name that reflects its purpose:
* "Weekly Appointment Reminders"
* "Customer Survey Outreach"
* "Payment Due Notifications"
* "Service Confirmation Calls"
Click **Create** to proceed to configuration.
You'll be redirected to the campaign configuration page:
Enter a descriptive campaign name that reflects its purpose:
* "Weekly Appointment Reminders"
* "Customer Survey Outreach"
* "Payment Due Notifications"
* "Service Confirmation Calls"
Click **Create** to proceed to configuration.
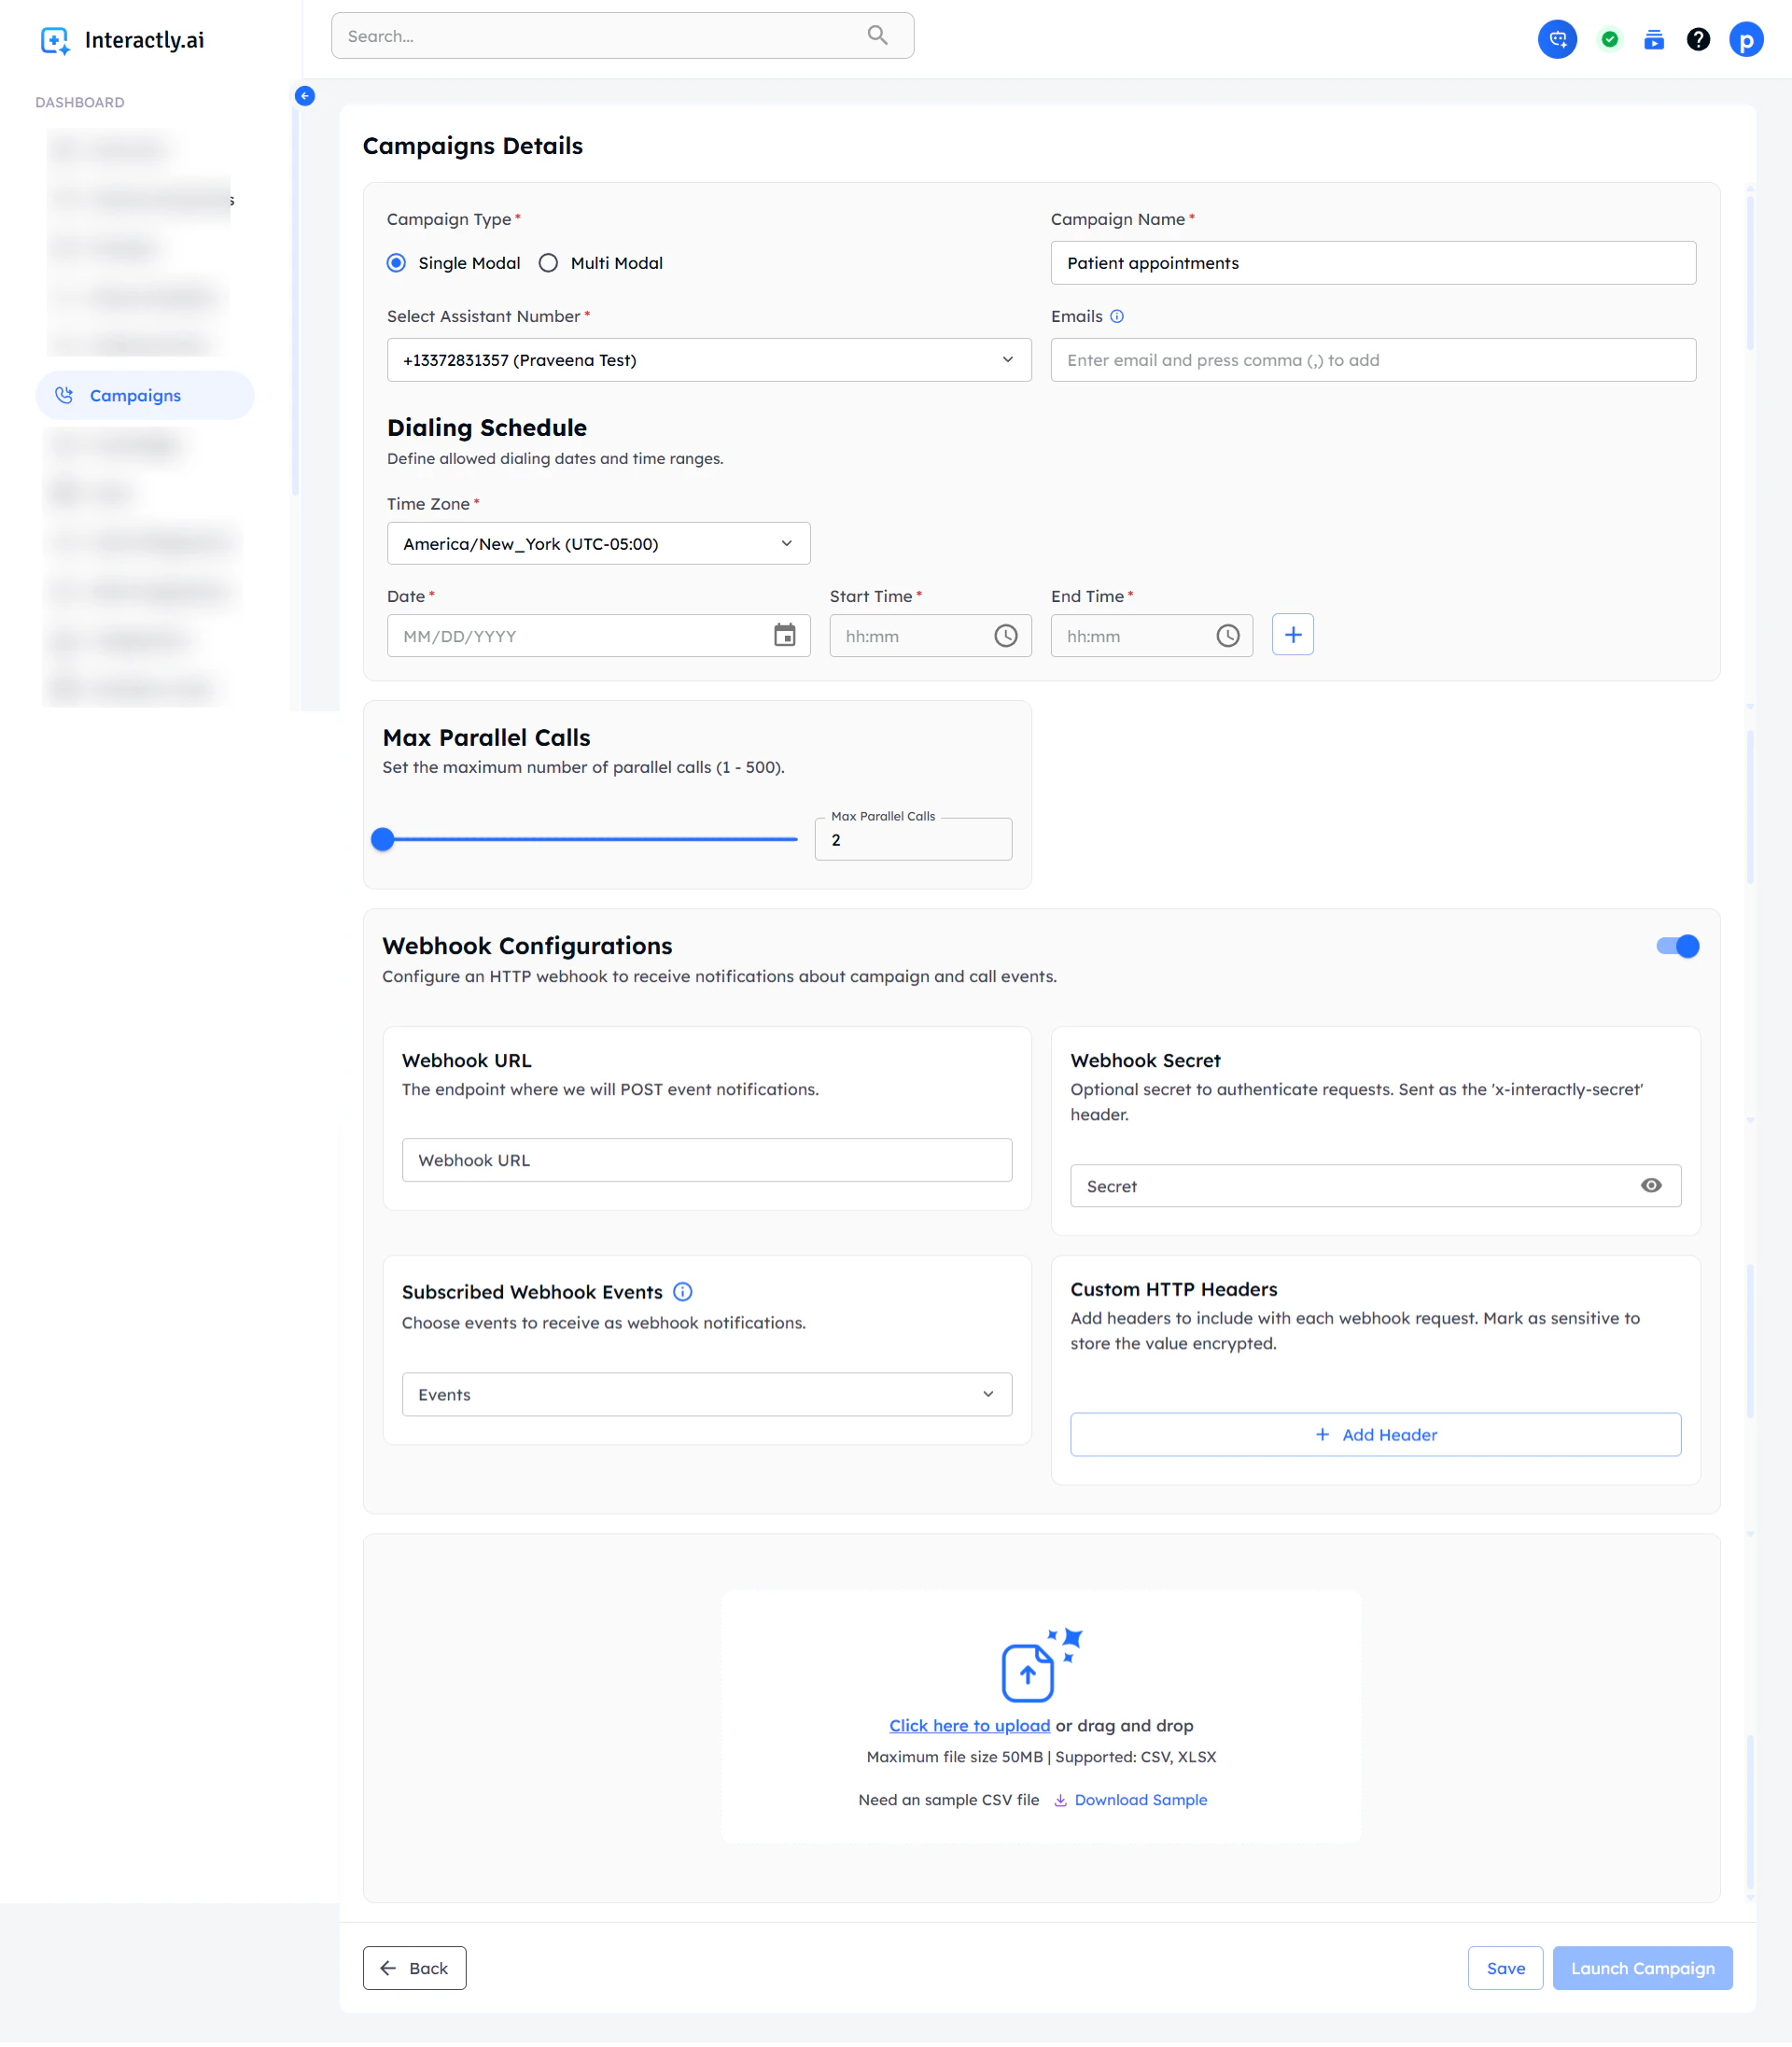
You'll be redirected to the campaign configuration page:
 ## Campaign Configuration
### Campaign Type Selection
Select **Single-Modal** to create voice-only campaigns:
* **Voice calls only** - no messaging complexity
* **Streamlined setup** - focus purely on call configuration
* **Cost-effective** - no SMS charges
* **Simple workflow** - one communication channel
Need SMS capabilities? Create a [Multi-Modal Campaign](/campaigns/multi-modal-campaign) instead.
### Assistant Configuration
Choose your AI assistant from the dropdown menu. This determines:
* **Phone number** used for outbound calls
* **AI model** and voice configuration
* **Conversation flow** and response patterns
* **Voice characteristics** and speaking style
### Notification Settings
Add your email address to receive:
* Campaign launch confirmations
* Real-time status updates
* Error alerts and warnings
* Final completion reports
Press **Enter** after typing your email to confirm it's properly added to the notification list.
### Schedule Configuration
#### Time Zone Settings
* **Default**: America/New York
* **Customizable**: Select from available time zones
* **Important**: Affects all call timing in your campaign
#### Campaign Timing
Configure flexible scheduling for your voice calls with multiple dates and custom timings:
You can schedule campaigns across multiple dates, each with their own start and end times for maximum flexibility.
**Flexible Date Selection**
* Add multiple target dates for your campaign
* Each date can have different timing windows
* Perfect for multi-day outreach sequences
**Individual Day Control**
* Set unique start/end times per date
* No requirement for consistent timing
* Adapt to different time zones or business hours
#### How Campaign Timing Works
Add as many campaign dates as needed, each with custom timing windows
* **Day 1**: January 15, 9:00 AM - 5:00 PM
* **Day 2**: January 16, 2:00 PM - 8:00 PM
* **Day 3**: January 20, 10:00 AM - 3:00 PM
Campaign moves through scheduled dates in sequence, making calls during each time window
Campaign ends when **either** condition is met:
* ✅ All calls reach their final stage (completed/failed)
* ✅ All scheduled dates and times have passed
**Important**: If your campaign completes all calls before reaching later scheduled dates, those remaining dates will be skipped automatically.
**Example**: If you schedule 3 days but all contacts are successfully called on day 1, days 2 and 3 won't execute.
This ensures efficient resource usage and prevents unnecessary processing.
Use multiple dates with different timings to accommodate varying contact preferences, time zones, or business operating hours.
### Call Volume Management
Control how many simultaneous calls your campaign can make:
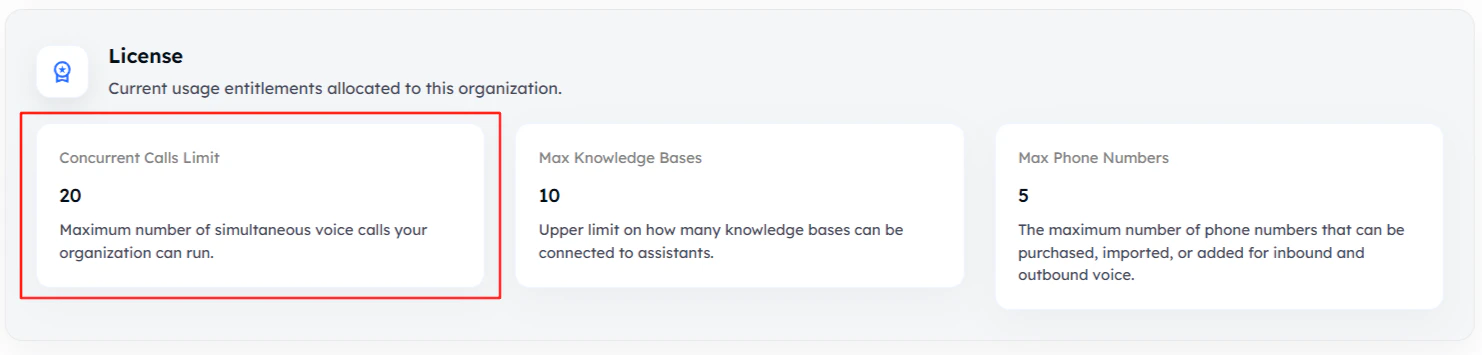
Your maximum parallel calls cannot exceed your organization's license limit. Check your limits before setting this value.
**To verify your organization limits:**
1. Navigate to **My Organization** → **License**
2. Review your org limit set by the Interactly team
3. Configure max parallel calls within this limit
## Campaign Configuration
### Campaign Type Selection
Select **Single-Modal** to create voice-only campaigns:
* **Voice calls only** - no messaging complexity
* **Streamlined setup** - focus purely on call configuration
* **Cost-effective** - no SMS charges
* **Simple workflow** - one communication channel
Need SMS capabilities? Create a [Multi-Modal Campaign](/campaigns/multi-modal-campaign) instead.
### Assistant Configuration
Choose your AI assistant from the dropdown menu. This determines:
* **Phone number** used for outbound calls
* **AI model** and voice configuration
* **Conversation flow** and response patterns
* **Voice characteristics** and speaking style
### Notification Settings
Add your email address to receive:
* Campaign launch confirmations
* Real-time status updates
* Error alerts and warnings
* Final completion reports
Press **Enter** after typing your email to confirm it's properly added to the notification list.
### Schedule Configuration
#### Time Zone Settings
* **Default**: America/New York
* **Customizable**: Select from available time zones
* **Important**: Affects all call timing in your campaign
#### Campaign Timing
Configure flexible scheduling for your voice calls with multiple dates and custom timings:
You can schedule campaigns across multiple dates, each with their own start and end times for maximum flexibility.
**Flexible Date Selection**
* Add multiple target dates for your campaign
* Each date can have different timing windows
* Perfect for multi-day outreach sequences
**Individual Day Control**
* Set unique start/end times per date
* No requirement for consistent timing
* Adapt to different time zones or business hours
#### How Campaign Timing Works
Add as many campaign dates as needed, each with custom timing windows
* **Day 1**: January 15, 9:00 AM - 5:00 PM
* **Day 2**: January 16, 2:00 PM - 8:00 PM
* **Day 3**: January 20, 10:00 AM - 3:00 PM
Campaign moves through scheduled dates in sequence, making calls during each time window
Campaign ends when **either** condition is met:
* ✅ All calls reach their final stage (completed/failed)
* ✅ All scheduled dates and times have passed
**Important**: If your campaign completes all calls before reaching later scheduled dates, those remaining dates will be skipped automatically.
**Example**: If you schedule 3 days but all contacts are successfully called on day 1, days 2 and 3 won't execute.
This ensures efficient resource usage and prevents unnecessary processing.
Use multiple dates with different timings to accommodate varying contact preferences, time zones, or business operating hours.
### Call Volume Management
Control how many simultaneous calls your campaign can make:
Your maximum parallel calls cannot exceed your organization's license limit. Check your limits before setting this value.
**To verify your organization limits:**
1. Navigate to **My Organization** → **License**
2. Review your org limit set by the Interactly team
3. Configure max parallel calls within this limit
 ## Webhook Integration
Webhooks allow your application to receive real-time updates about campaign and call statuses. This enables you to build custom integrations and automated workflows.
### Webhook Configuration
The endpoint where Interactly will send webhook notifications
Optional security header (`x-interactly-secret`) to verify webhook authenticity
Choose which events trigger webhook notifications
### Available Webhook Events
#### Call Status Events
Receive immediate notifications when individual calls complete or fail.
```json theme={null}
{
"event": "call_status",
"campaign": {
"id": "cmp_123456",
"teamId": "team_001",
"name": "November Outreach",
"createdAt": "2025-11-05T08:10:11.129Z",
"updatedAt": "2025-11-05T08:10:11.129Z",
"processTimings": {
"launchAt": "2025-11-05T08:10:19.242Z",
"resumeAt": null,
"completedAt": "2025-11-05T08:10:19.242Z"
}
},
"call": {
"id": "call_001",
"status": "completed",
"outcome": "no_answer",
"conversationId": "conv_123e4567-e89b-12d3-a456-426614174000",
"assistantNumber": "+12058820192",
"phoneNumber": "+15105550123",
"collectedInformation": {
"leadName": "Jane Doe",
"zip": "94105"
},
"errorCode": null,
"errorMessage": null,
"createdAt": "2025-11-05T08:43:37.018Z",
"updatedAt": "2025-11-05T08:43:37.018Z"
}
}
```
#### Campaign Report Events
Get a comprehensive summary when your entire campaign completes.
```json theme={null}
{
"event": "campaign_report",
"campaign": {
"id": "cmp_123456",
"teamId": "team_001",
"name": "November Campaign",
"createdAt": "2025-11-05T08:10:11.129Z",
"updatedAt": "2025-11-05T08:10:11.129Z",
"processTimings": {
"launchAt": "2025-11-05T08:10:19.242Z",
"resumeAt": null,
"completedAt": null
}
},
"report": {
"totalCalls": 42,
"completedCalls": 31,
"failedCalls": 11
}
}
```
#### Campaign Status Events
Receive notifications whenever a campaign transitions to a new lifecycle status — processing, paused, or aborted.
```json theme={null}
{
"event": "campaign_status",
"campaign": {
"id": "cmp_123456",
"teamId": "team_001",
"name": "November Outreach",
"createdAt": "2025-11-05T08:10:11.129Z",
"updatedAt": "2025-11-05T08:10:19.242Z",
"processTimings": {
"launchAt": "2025-11-05T08:10:19.242Z",
"resumeAt": null,
"completedAt": null
}
},
"status": "processing"
}
```
The `status` field reflects the campaign's new state at the time of the event. Possible values:
| Status | Trigger |
| ------------ | ---------------------------- |
| `processing` | Campaign launched or resumed |
| `paused` | Campaign manually paused |
| `aborted` | Campaign manually stopped |
#### Custom HTTP Headers
Add additional headers like `Authorization` for enhanced security and integration with your systems.
## Contact Data Upload
For single-modal campaigns, you only need contact data relevant to voice calls.
To upload the file with records first download the sample file.
### **Sample file for Voice-Only Campaigns**:
Since this is a single-modal campaign, focus on data needed for voice interactions only
* **phone\_number** (mandatory): The primary field - the number to call
* **Voice prompt variables**: Fields used as dynamic variables in your AI assistant's voice prompts
* **Call-relevant data**: Information your assistant needs during the voice conversation
* You can add as many contact records as needed
* All voice prompt variables must be populated
* Once the file is ready, click upload to add your contacts
* Missing required fields will prevent upload - you can **delete** and re-upload if needed
## Webhook Integration
Webhooks allow your application to receive real-time updates about campaign and call statuses. This enables you to build custom integrations and automated workflows.
### Webhook Configuration
The endpoint where Interactly will send webhook notifications
Optional security header (`x-interactly-secret`) to verify webhook authenticity
Choose which events trigger webhook notifications
### Available Webhook Events
#### Call Status Events
Receive immediate notifications when individual calls complete or fail.
```json theme={null}
{
"event": "call_status",
"campaign": {
"id": "cmp_123456",
"teamId": "team_001",
"name": "November Outreach",
"createdAt": "2025-11-05T08:10:11.129Z",
"updatedAt": "2025-11-05T08:10:11.129Z",
"processTimings": {
"launchAt": "2025-11-05T08:10:19.242Z",
"resumeAt": null,
"completedAt": "2025-11-05T08:10:19.242Z"
}
},
"call": {
"id": "call_001",
"status": "completed",
"outcome": "no_answer",
"conversationId": "conv_123e4567-e89b-12d3-a456-426614174000",
"assistantNumber": "+12058820192",
"phoneNumber": "+15105550123",
"collectedInformation": {
"leadName": "Jane Doe",
"zip": "94105"
},
"errorCode": null,
"errorMessage": null,
"createdAt": "2025-11-05T08:43:37.018Z",
"updatedAt": "2025-11-05T08:43:37.018Z"
}
}
```
#### Campaign Report Events
Get a comprehensive summary when your entire campaign completes.
```json theme={null}
{
"event": "campaign_report",
"campaign": {
"id": "cmp_123456",
"teamId": "team_001",
"name": "November Campaign",
"createdAt": "2025-11-05T08:10:11.129Z",
"updatedAt": "2025-11-05T08:10:11.129Z",
"processTimings": {
"launchAt": "2025-11-05T08:10:19.242Z",
"resumeAt": null,
"completedAt": null
}
},
"report": {
"totalCalls": 42,
"completedCalls": 31,
"failedCalls": 11
}
}
```
#### Campaign Status Events
Receive notifications whenever a campaign transitions to a new lifecycle status — processing, paused, or aborted.
```json theme={null}
{
"event": "campaign_status",
"campaign": {
"id": "cmp_123456",
"teamId": "team_001",
"name": "November Outreach",
"createdAt": "2025-11-05T08:10:11.129Z",
"updatedAt": "2025-11-05T08:10:19.242Z",
"processTimings": {
"launchAt": "2025-11-05T08:10:19.242Z",
"resumeAt": null,
"completedAt": null
}
},
"status": "processing"
}
```
The `status` field reflects the campaign's new state at the time of the event. Possible values:
| Status | Trigger |
| ------------ | ---------------------------- |
| `processing` | Campaign launched or resumed |
| `paused` | Campaign manually paused |
| `aborted` | Campaign manually stopped |
#### Custom HTTP Headers
Add additional headers like `Authorization` for enhanced security and integration with your systems.
## Contact Data Upload
For single-modal campaigns, you only need contact data relevant to voice calls.
To upload the file with records first download the sample file.
### **Sample file for Voice-Only Campaigns**:
Since this is a single-modal campaign, focus on data needed for voice interactions only
* **phone\_number** (mandatory): The primary field - the number to call
* **Voice prompt variables**: Fields used as dynamic variables in your AI assistant's voice prompts
* **Call-relevant data**: Information your assistant needs during the voice conversation
* You can add as many contact records as needed
* All voice prompt variables must be populated
* Once the file is ready, click upload to add your contacts
* Missing required fields will prevent upload - you can **delete** and re-upload if needed
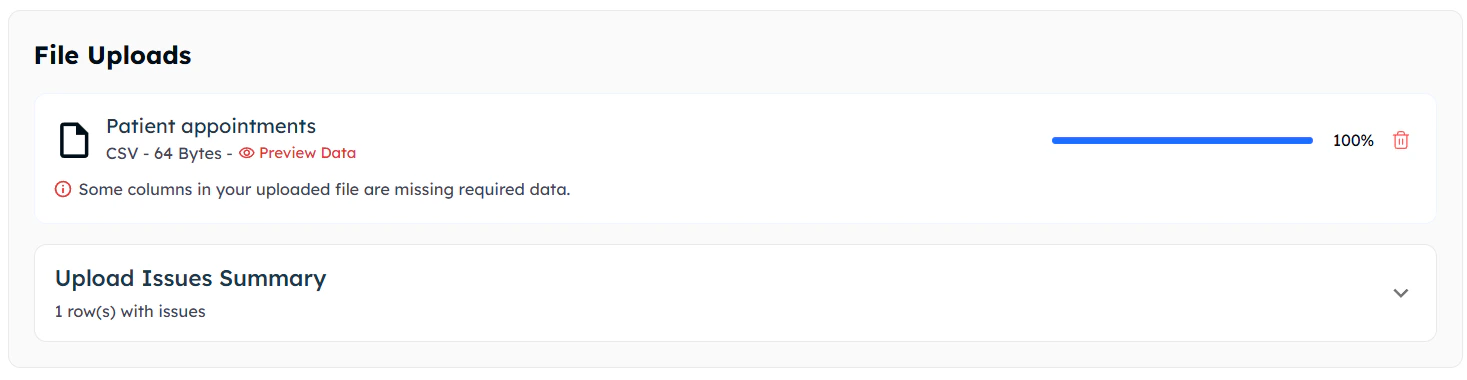
- You can click on preview to see the uploaded file.
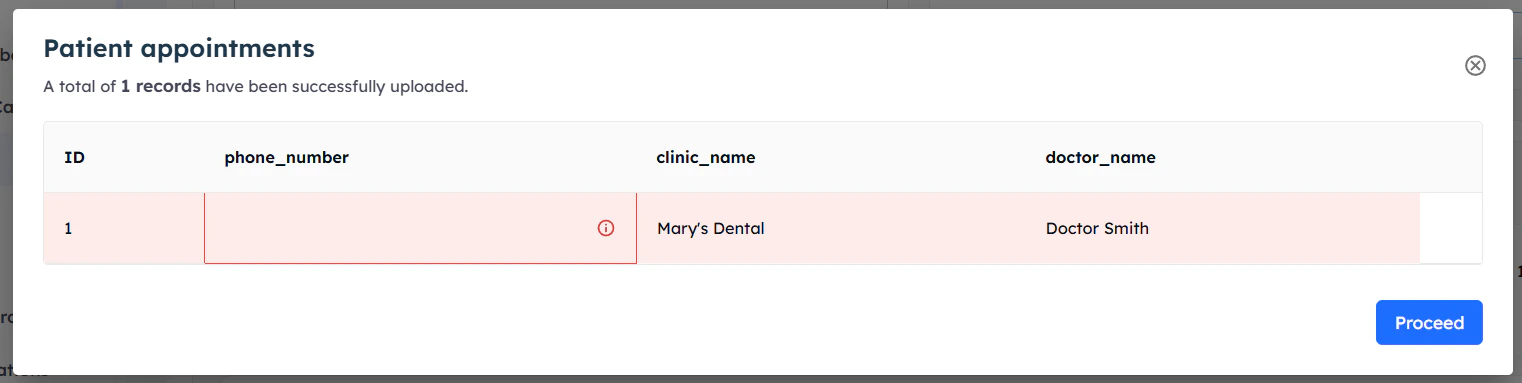
- You can upload more files while the campaign is running by clicking on “upload”.
## Launching Your Campaign
After configuring all settings and uploading contacts:
Save your campaign configuration to launch at a later time
Start your campaign immediately if you're ready
When your campaign launches, you'll see the campaign list page:
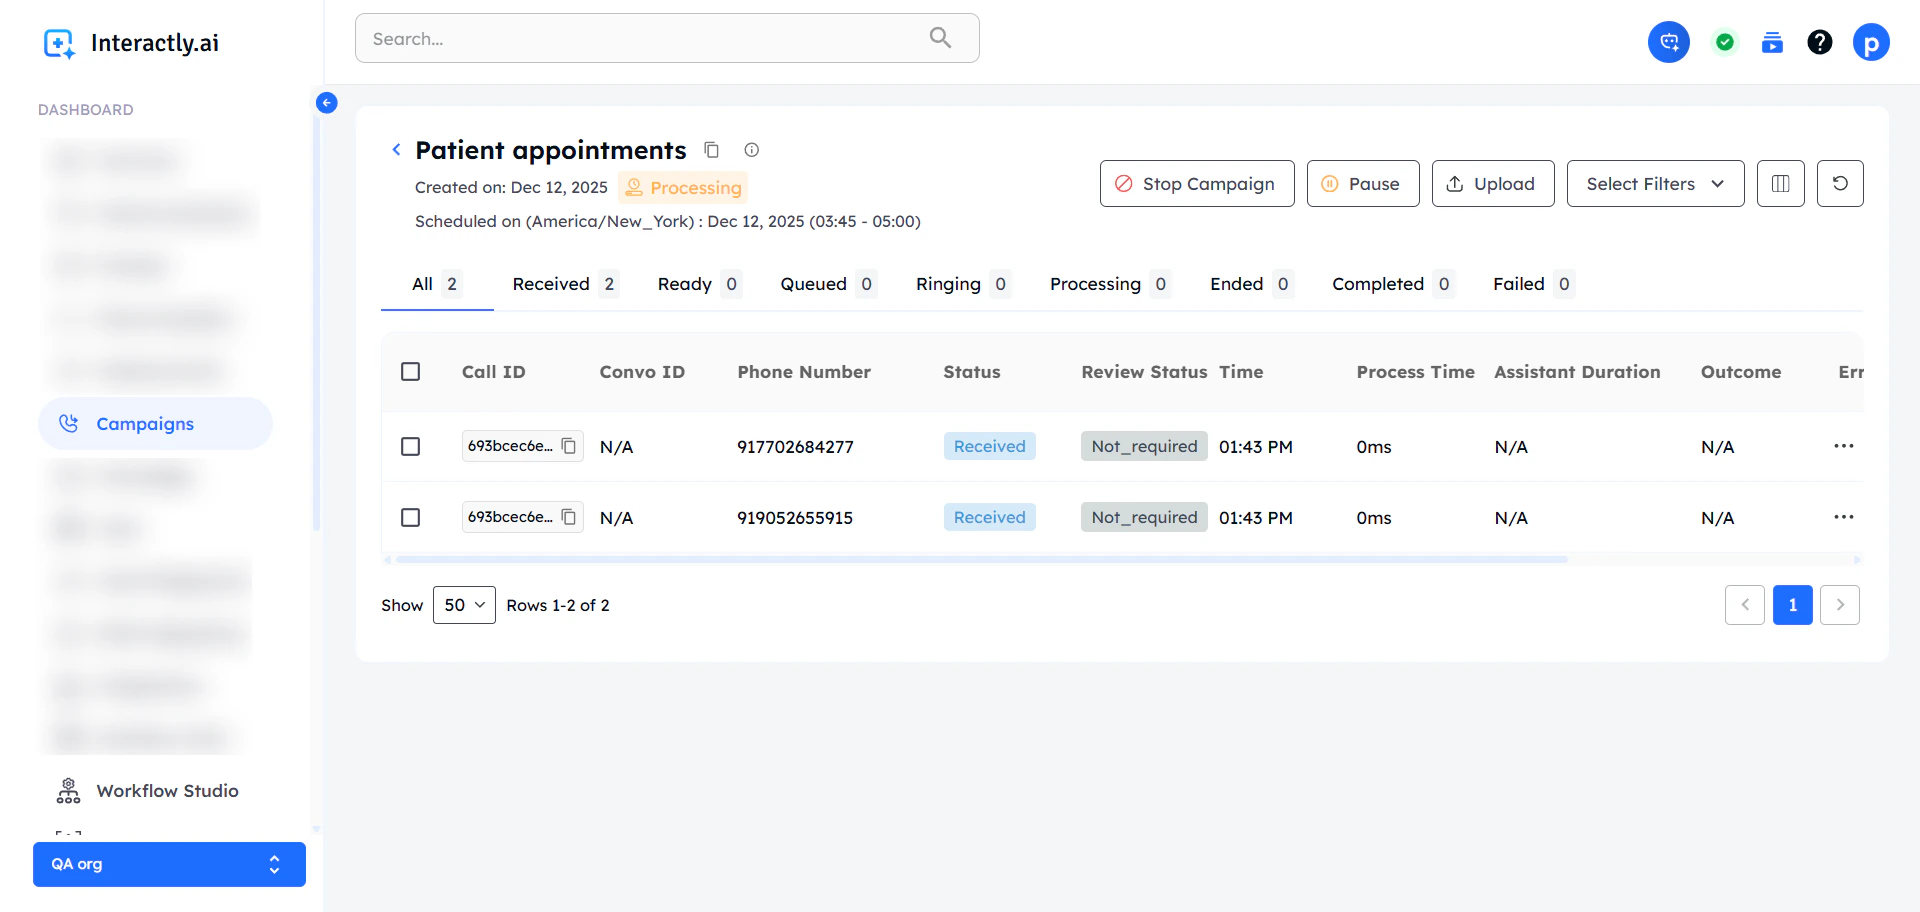
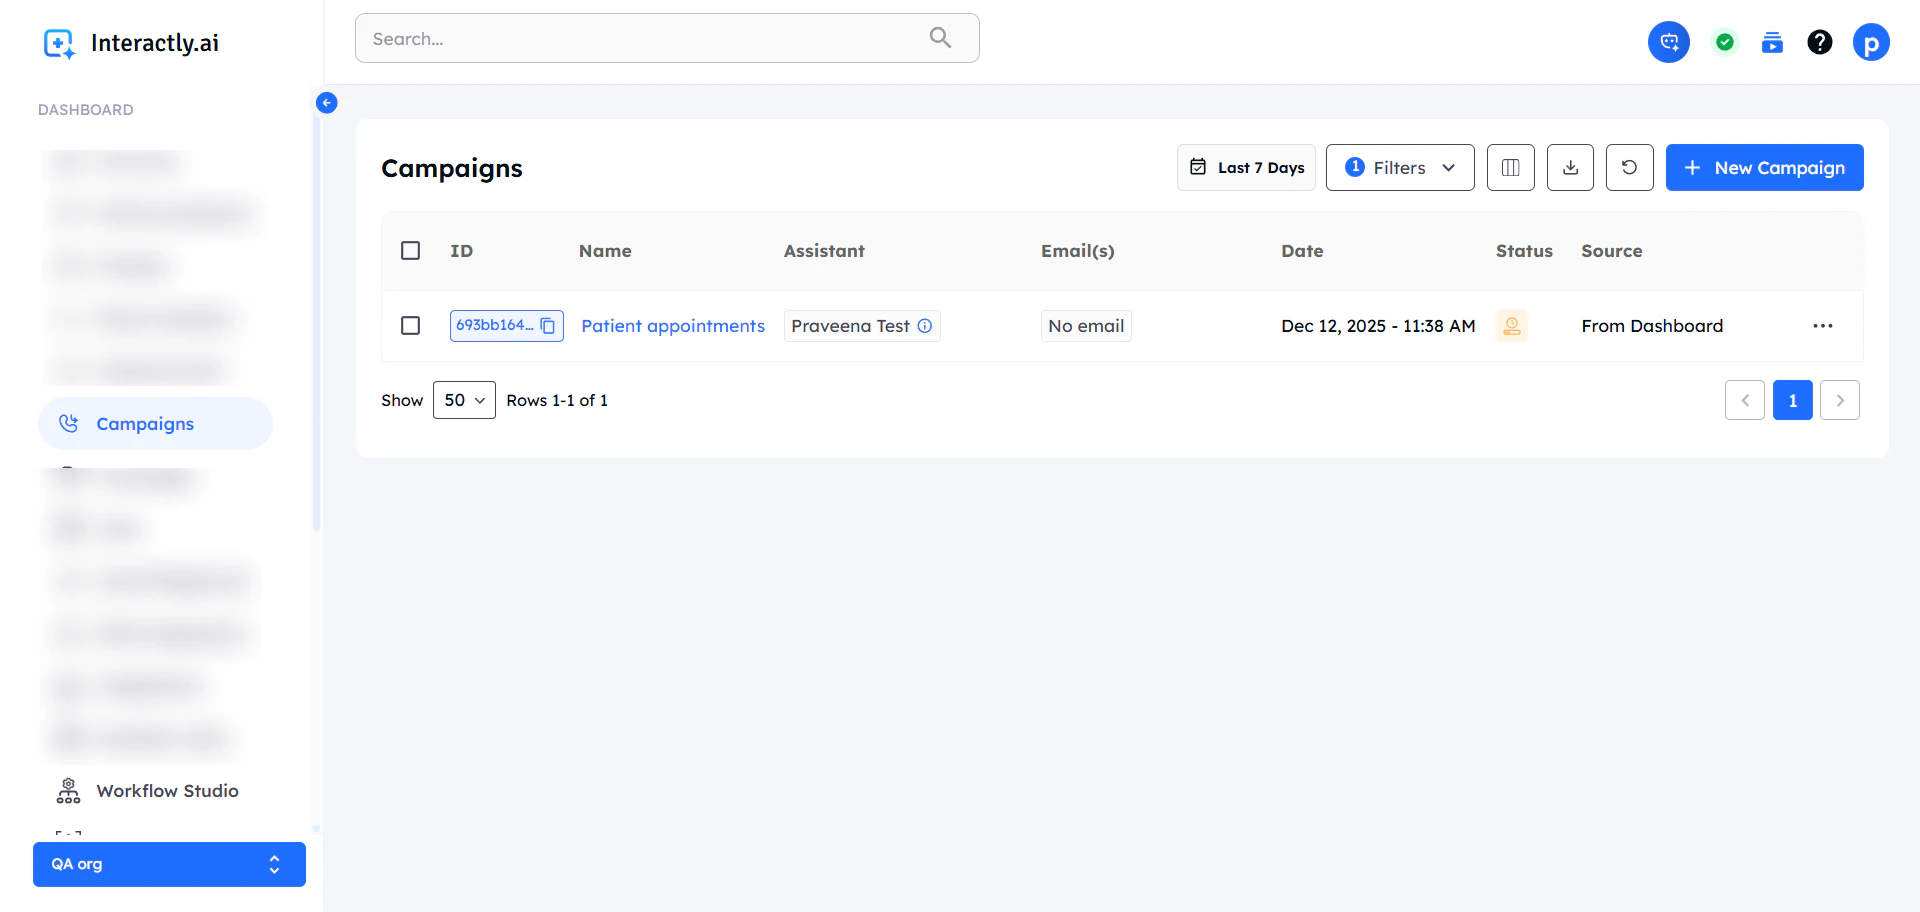 Click on your campaign to view the detailed calls page:
 ## Campaign Status Tracking
### Call Status Progression
Initial status when campaign launches and contacts are loaded
* **Ready**: Contact validation successful, ready to call
* **Failed**: Validation failed (invalid number, missing data)
Calls are scheduled and waiting for their turn based on campaign timing
* **Ringing**: Phone is ringing, waiting for answer
* **Processing**: Active conversation in progress
* **End**: Call completed successfully
### Campaign Status Overview
Campaign is actively making calls and managing conversations
All calls have either completed successfully or failed - campaign is finished
#### **Edit Campaign**:
* After saving the campaign if you want to edit the campaign click on the 3 dots and select “Edit campaign”.
* Save the campaign after making the changes.
#### **View Campaign Details**:
* Click on the 3 dots and select the “view details” option to see the campaign details.
* You can edit the campaign form this page also.
## Campaign Status Tracking
### Call Status Progression
Initial status when campaign launches and contacts are loaded
* **Ready**: Contact validation successful, ready to call
* **Failed**: Validation failed (invalid number, missing data)
Calls are scheduled and waiting for their turn based on campaign timing
* **Ringing**: Phone is ringing, waiting for answer
* **Processing**: Active conversation in progress
* **End**: Call completed successfully
### Campaign Status Overview
Campaign is actively making calls and managing conversations
All calls have either completed successfully or failed - campaign is finished
#### **Edit Campaign**:
* After saving the campaign if you want to edit the campaign click on the 3 dots and select “Edit campaign”.
* Save the campaign after making the changes.
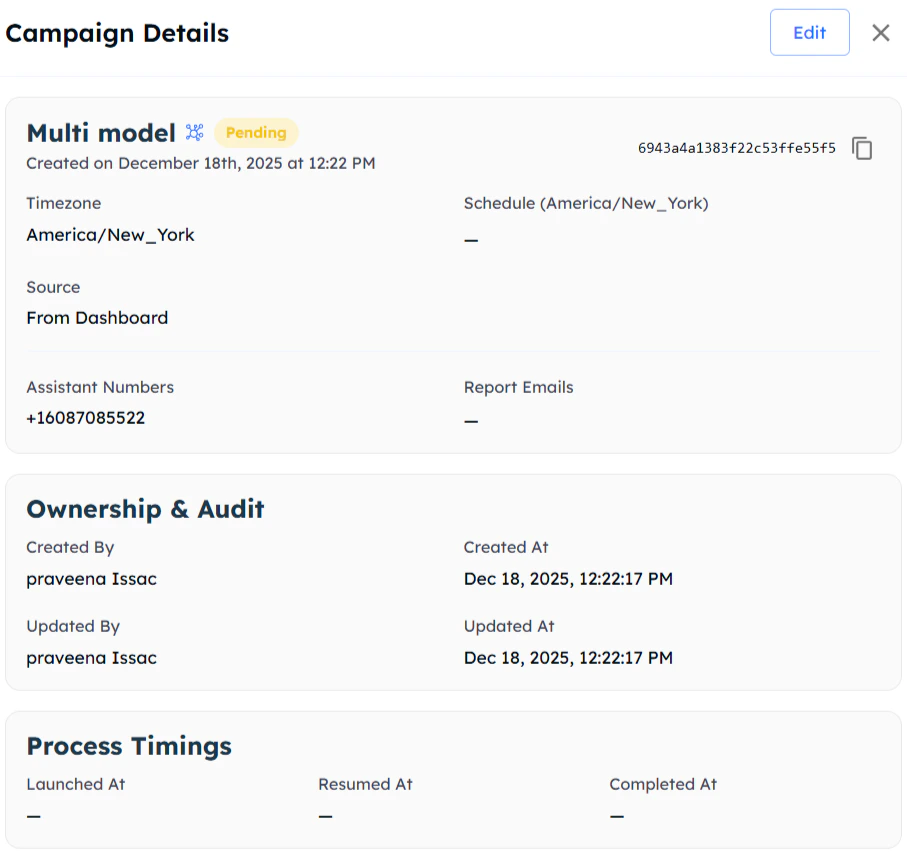
#### **View Campaign Details**:
* Click on the 3 dots and select the “view details” option to see the campaign details.
* You can edit the campaign form this page also.
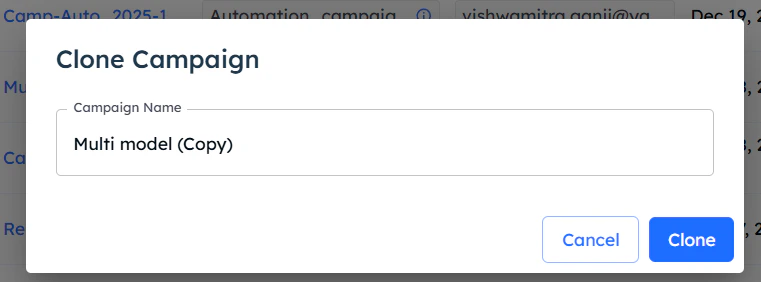
 ### **Clone Campaign**:
* You can duplicate a campaign by clicking on “clone campaign”.
* Give a name to the campaign and save it.
* All the original campaign fields will be added in the cloned campaign.
* You can edit the campaign to make changes.
### **Clone Campaign**:
* You can duplicate a campaign by clicking on “clone campaign”.
* Give a name to the campaign and save it.
* All the original campaign fields will be added in the cloned campaign.
* You can edit the campaign to make changes.
 #### **Delete Campaign**:
* Click on “delete campaign” , to delete the campaign.
* The campaign along with the calls will be deleted.
* Once a campaign is deleted , it can’t be restored.
#### **Pause the campaign**:
* If you want to pause the campaign while the campaign is running, you can do that by clicking on the “pause campaign” from the three dots.
* The calls that are already running will be continued and the calls that are in queued state will remain in queued until the campaign is resumed.
#### **Stop Campaign**:
* A campaign can be aborted by clicking on “stop campaign” .
* All the calls that are not triggered will be aborted.
* The campaign status will be changed to “completed” once all the running calls are either “finished” or “failed”.
**Action Behavior**:
* **Pause**: Running calls continue, queued calls wait
* **Stop**: Immediate halt - remaining calls are marked as aborted
* **Actions are irreversible** once executed
## Best Practices for Single-Modal Campaigns
Optimize your AI assistant's voice prompts since this is your only interaction channel
Always test your voice interactions thoroughly before launching large campaigns
Use webhooks and dashboard to track voice call performance and outcomes
Schedule voice calls during appropriate business hours for your audience
Make sure your AI assistant provides clear, concise voice instructions
## When to Choose Single-Modal vs Multi-Modal
### Choose Single-Modal Campaigns When:
* ✅ You only need voice interactions
* ✅ Simple appointment reminders or confirmations
* ✅ Quick surveys or data collection calls
* ✅ Direct customer service interactions
* ✅ Streamlined workflow is preferred
* ✅ No messaging requirements
### Choose Multi-Modal Campaigns When:
* 📱 You need pre-call SMS notifications
* 📱 Post-call follow-up messages are required
* 📱 Complex multi-step communication flows
* 📱 Document or link sharing is needed
* 📱 Mixed communication preferences in your audience
If you're unsure, start with single-modal for simplicity. You can always create a multi-modal campaign later if you need messaging capabilities.
## API Reference - Creating Campaigns
To programmatically create single-modal campaigns, use the Campaign Creation API:
**Endpoint**: [Create Campaign](/api-reference/campaigns/campaigns/create-campaigns)
Create new single-modal campaigns through REST API calls. This endpoint allows you to:
* Set up voice-only campaign configurations
* Define AI assistant settings
* Configure scheduling and timing
* Upload contact data programmatically
* Set webhook integrations
The API follows the same configuration options available in the dashboard, giving you full control over campaign creation through code.
## API Reference - Managing Campaign Details
Once your campaign is created, you can retrieve and update its configuration:
**Endpoint**: [Get Campaign by ID](/api-reference/campaigns/campaigns/get-campaign-by-id)
Retrieve complete campaign information including:
* Campaign configuration settings
* Current status and progress
* Contact count and call statistics
* Schedule and timing details
**Endpoint**: [Update Campaign](/api-reference/campaigns/campaigns/patch-campaign-with-id)
Modify campaign settings after creation:
* Update timing and schedules
* Change notification settings
* Modify webhook configurations
* Adjust call volume limits
## API Reference - Contact Management
For programmatic contact management, use the Campaign Calls API:
**Endpoint**: [Create Campaign Calls](/api-reference/campaigns/campaigns-calls/create-campaigns-calls)
Programmatically add contacts to your campaign:
* Bulk upload contact data via API
* Real-time contact addition during campaign
* Validate contact information automatically
* Support for custom fields and variables
* Integrate with your CRM or contact management systems
This API is perfect for integrating Interactly campaigns with your existing workflows, allowing dynamic contact addition based on business rules or user actions.
## API Reference - Campaign Monitoring
To programmatically monitor your campaign's progress and retrieve detailed information:
**Endpoint**: [Get Campaign by ID](/api-reference/campaigns/campaigns/get-campaign-by-id)
Monitor campaign progress:
* Overall campaign status
* Call completion statistics
* Success and failure rates
* Current processing state
**Endpoint**: [Get Call by Call ID](/api-reference/campaigns/campaigns-calls/get-call-by-call-id)
Individual call information:
* Call status and progression
* Conversation outcomes
* Collected data from calls
* Error details and timestamps
This API is essential for building custom dashboards, generating reports, and monitoring campaign performance in real-time.
## API Reference - Campaign Actions
For programmatic control of your campaigns, use the Campaign Actions API:
**Endpoint**: [Action Campaign by ID](/api-reference/campaigns/campaigns/action-campaign-by-id)
Control campaign execution through API calls:
* **Launch**: Start your configured campaign
* **Pause**: Temporarily halt call processing while maintaining queue
* **Resume**: Continue paused campaigns from where they left off
* **Stop**: Permanently abort remaining calls in the campaign
This API provides the same campaign control actions available in the dashboard interface, allowing you to build automated campaign management workflows.
## Next Steps
Ready to explore more campaign options or enhance your setup?
Add pre and post-call messaging capabilities to your campaigns
Return to main campaigns documentation
#### **Delete Campaign**:
* Click on “delete campaign” , to delete the campaign.
* The campaign along with the calls will be deleted.
* Once a campaign is deleted , it can’t be restored.
#### **Pause the campaign**:
* If you want to pause the campaign while the campaign is running, you can do that by clicking on the “pause campaign” from the three dots.
* The calls that are already running will be continued and the calls that are in queued state will remain in queued until the campaign is resumed.
#### **Stop Campaign**:
* A campaign can be aborted by clicking on “stop campaign” .
* All the calls that are not triggered will be aborted.
* The campaign status will be changed to “completed” once all the running calls are either “finished” or “failed”.
**Action Behavior**:
* **Pause**: Running calls continue, queued calls wait
* **Stop**: Immediate halt - remaining calls are marked as aborted
* **Actions are irreversible** once executed
## Best Practices for Single-Modal Campaigns
Optimize your AI assistant's voice prompts since this is your only interaction channel
Always test your voice interactions thoroughly before launching large campaigns
Use webhooks and dashboard to track voice call performance and outcomes
Schedule voice calls during appropriate business hours for your audience
Make sure your AI assistant provides clear, concise voice instructions
## When to Choose Single-Modal vs Multi-Modal
### Choose Single-Modal Campaigns When:
* ✅ You only need voice interactions
* ✅ Simple appointment reminders or confirmations
* ✅ Quick surveys or data collection calls
* ✅ Direct customer service interactions
* ✅ Streamlined workflow is preferred
* ✅ No messaging requirements
### Choose Multi-Modal Campaigns When:
* 📱 You need pre-call SMS notifications
* 📱 Post-call follow-up messages are required
* 📱 Complex multi-step communication flows
* 📱 Document or link sharing is needed
* 📱 Mixed communication preferences in your audience
If you're unsure, start with single-modal for simplicity. You can always create a multi-modal campaign later if you need messaging capabilities.
## API Reference - Creating Campaigns
To programmatically create single-modal campaigns, use the Campaign Creation API:
**Endpoint**: [Create Campaign](/api-reference/campaigns/campaigns/create-campaigns)
Create new single-modal campaigns through REST API calls. This endpoint allows you to:
* Set up voice-only campaign configurations
* Define AI assistant settings
* Configure scheduling and timing
* Upload contact data programmatically
* Set webhook integrations
The API follows the same configuration options available in the dashboard, giving you full control over campaign creation through code.
## API Reference - Managing Campaign Details
Once your campaign is created, you can retrieve and update its configuration:
**Endpoint**: [Get Campaign by ID](/api-reference/campaigns/campaigns/get-campaign-by-id)
Retrieve complete campaign information including:
* Campaign configuration settings
* Current status and progress
* Contact count and call statistics
* Schedule and timing details
**Endpoint**: [Update Campaign](/api-reference/campaigns/campaigns/patch-campaign-with-id)
Modify campaign settings after creation:
* Update timing and schedules
* Change notification settings
* Modify webhook configurations
* Adjust call volume limits
## API Reference - Contact Management
For programmatic contact management, use the Campaign Calls API:
**Endpoint**: [Create Campaign Calls](/api-reference/campaigns/campaigns-calls/create-campaigns-calls)
Programmatically add contacts to your campaign:
* Bulk upload contact data via API
* Real-time contact addition during campaign
* Validate contact information automatically
* Support for custom fields and variables
* Integrate with your CRM or contact management systems
This API is perfect for integrating Interactly campaigns with your existing workflows, allowing dynamic contact addition based on business rules or user actions.
## API Reference - Campaign Monitoring
To programmatically monitor your campaign's progress and retrieve detailed information:
**Endpoint**: [Get Campaign by ID](/api-reference/campaigns/campaigns/get-campaign-by-id)
Monitor campaign progress:
* Overall campaign status
* Call completion statistics
* Success and failure rates
* Current processing state
**Endpoint**: [Get Call by Call ID](/api-reference/campaigns/campaigns-calls/get-call-by-call-id)
Individual call information:
* Call status and progression
* Conversation outcomes
* Collected data from calls
* Error details and timestamps
This API is essential for building custom dashboards, generating reports, and monitoring campaign performance in real-time.
## API Reference - Campaign Actions
For programmatic control of your campaigns, use the Campaign Actions API:
**Endpoint**: [Action Campaign by ID](/api-reference/campaigns/campaigns/action-campaign-by-id)
Control campaign execution through API calls:
* **Launch**: Start your configured campaign
* **Pause**: Temporarily halt call processing while maintaining queue
* **Resume**: Continue paused campaigns from where they left off
* **Stop**: Permanently abort remaining calls in the campaign
This API provides the same campaign control actions available in the dashboard interface, allowing you to build automated campaign management workflows.
## Next Steps
Ready to explore more campaign options or enhance your setup?
Add pre and post-call messaging capabilities to your campaigns
Return to main campaigns documentation