> ## Documentation Index
> Fetch the complete documentation index at: https://docs.interactly.ai/llms.txt
> Use this file to discover all available pages before exploring further.
# Assistant Tools
> Learn how to configure and enable custom tool integrations to enhance your AI assistant's capabilities with your own business logic and APIs
# About
Assistant tools extend your AI assistant's capabilities by enabling custom integrations, actions, and data access. Create powerful, interactive AI experiences by connecting your own APIs, business logic, and services directly into your assistant's conversation flow.
## What are Custom Tools?
Custom tools allow you to integrate your own business logic, APIs, and services directly into your AI assistant's workflow through function calling. Your assistant can intelligently decide when to call your tools based on conversation context, execute your custom logic, and use the results to provide dynamic, data-driven responses.
## Key Benefits
* **Extend functionality**: Go beyond basic conversations
* **Access external data**: Connect to APIs and databases
* **Process complex tasks**: Analysis, calculations, and transformations
* **Real-time information**: Access current data during calls
* **Mix and match**: Use multiple tools together
* **Custom logic**: Implement your specific business rules
* **Dynamic responses**: Adapt based on tool outputs
* **Seamless integration**: Tools work within conversation flow
* **Customer service**: Access customer records during calls
* **Appointment scheduling**: Real-time calendar integration
* **Data analysis**: Process and interpret information on the fly
* **E-commerce**: Check inventory, process orders, update statuses
## How Custom Tools Work
Specify the function name, description, and parameters that your tool accepts.
* **Name**: Unique identifier for your function
* **Description**: What the tool does (helps AI know when to use it)
* **Parameters**: Input fields with types and descriptions
* **Required fields**: Specify which parameters are mandatory
During conversations, the AI assistant automatically determines when to use your tool based on the context and user needs.
The AI uses your tool's description to understand when it's appropriate to call it.
When triggered, your tool receives the parameters and executes your custom logic, returning results to the AI assistant.
The assistant incorporates your tool's output into the conversation naturally.
### Custom Tool Use Cases
* Fetch customer information
* Update contact records
* Log call notes
* Retrieve purchase history
* Check availability
* Book appointments
* Send confirmations
* Handle rescheduling
* Check product availability
* Process orders
* Track shipments
* Update order status
* Verify customer identity
* Check account status
* Validate credentials
* Access permissions
## Creating Custom Tools
1. Navigate to your Interactly dashboard
2. Click on **Tools** in the sidebar
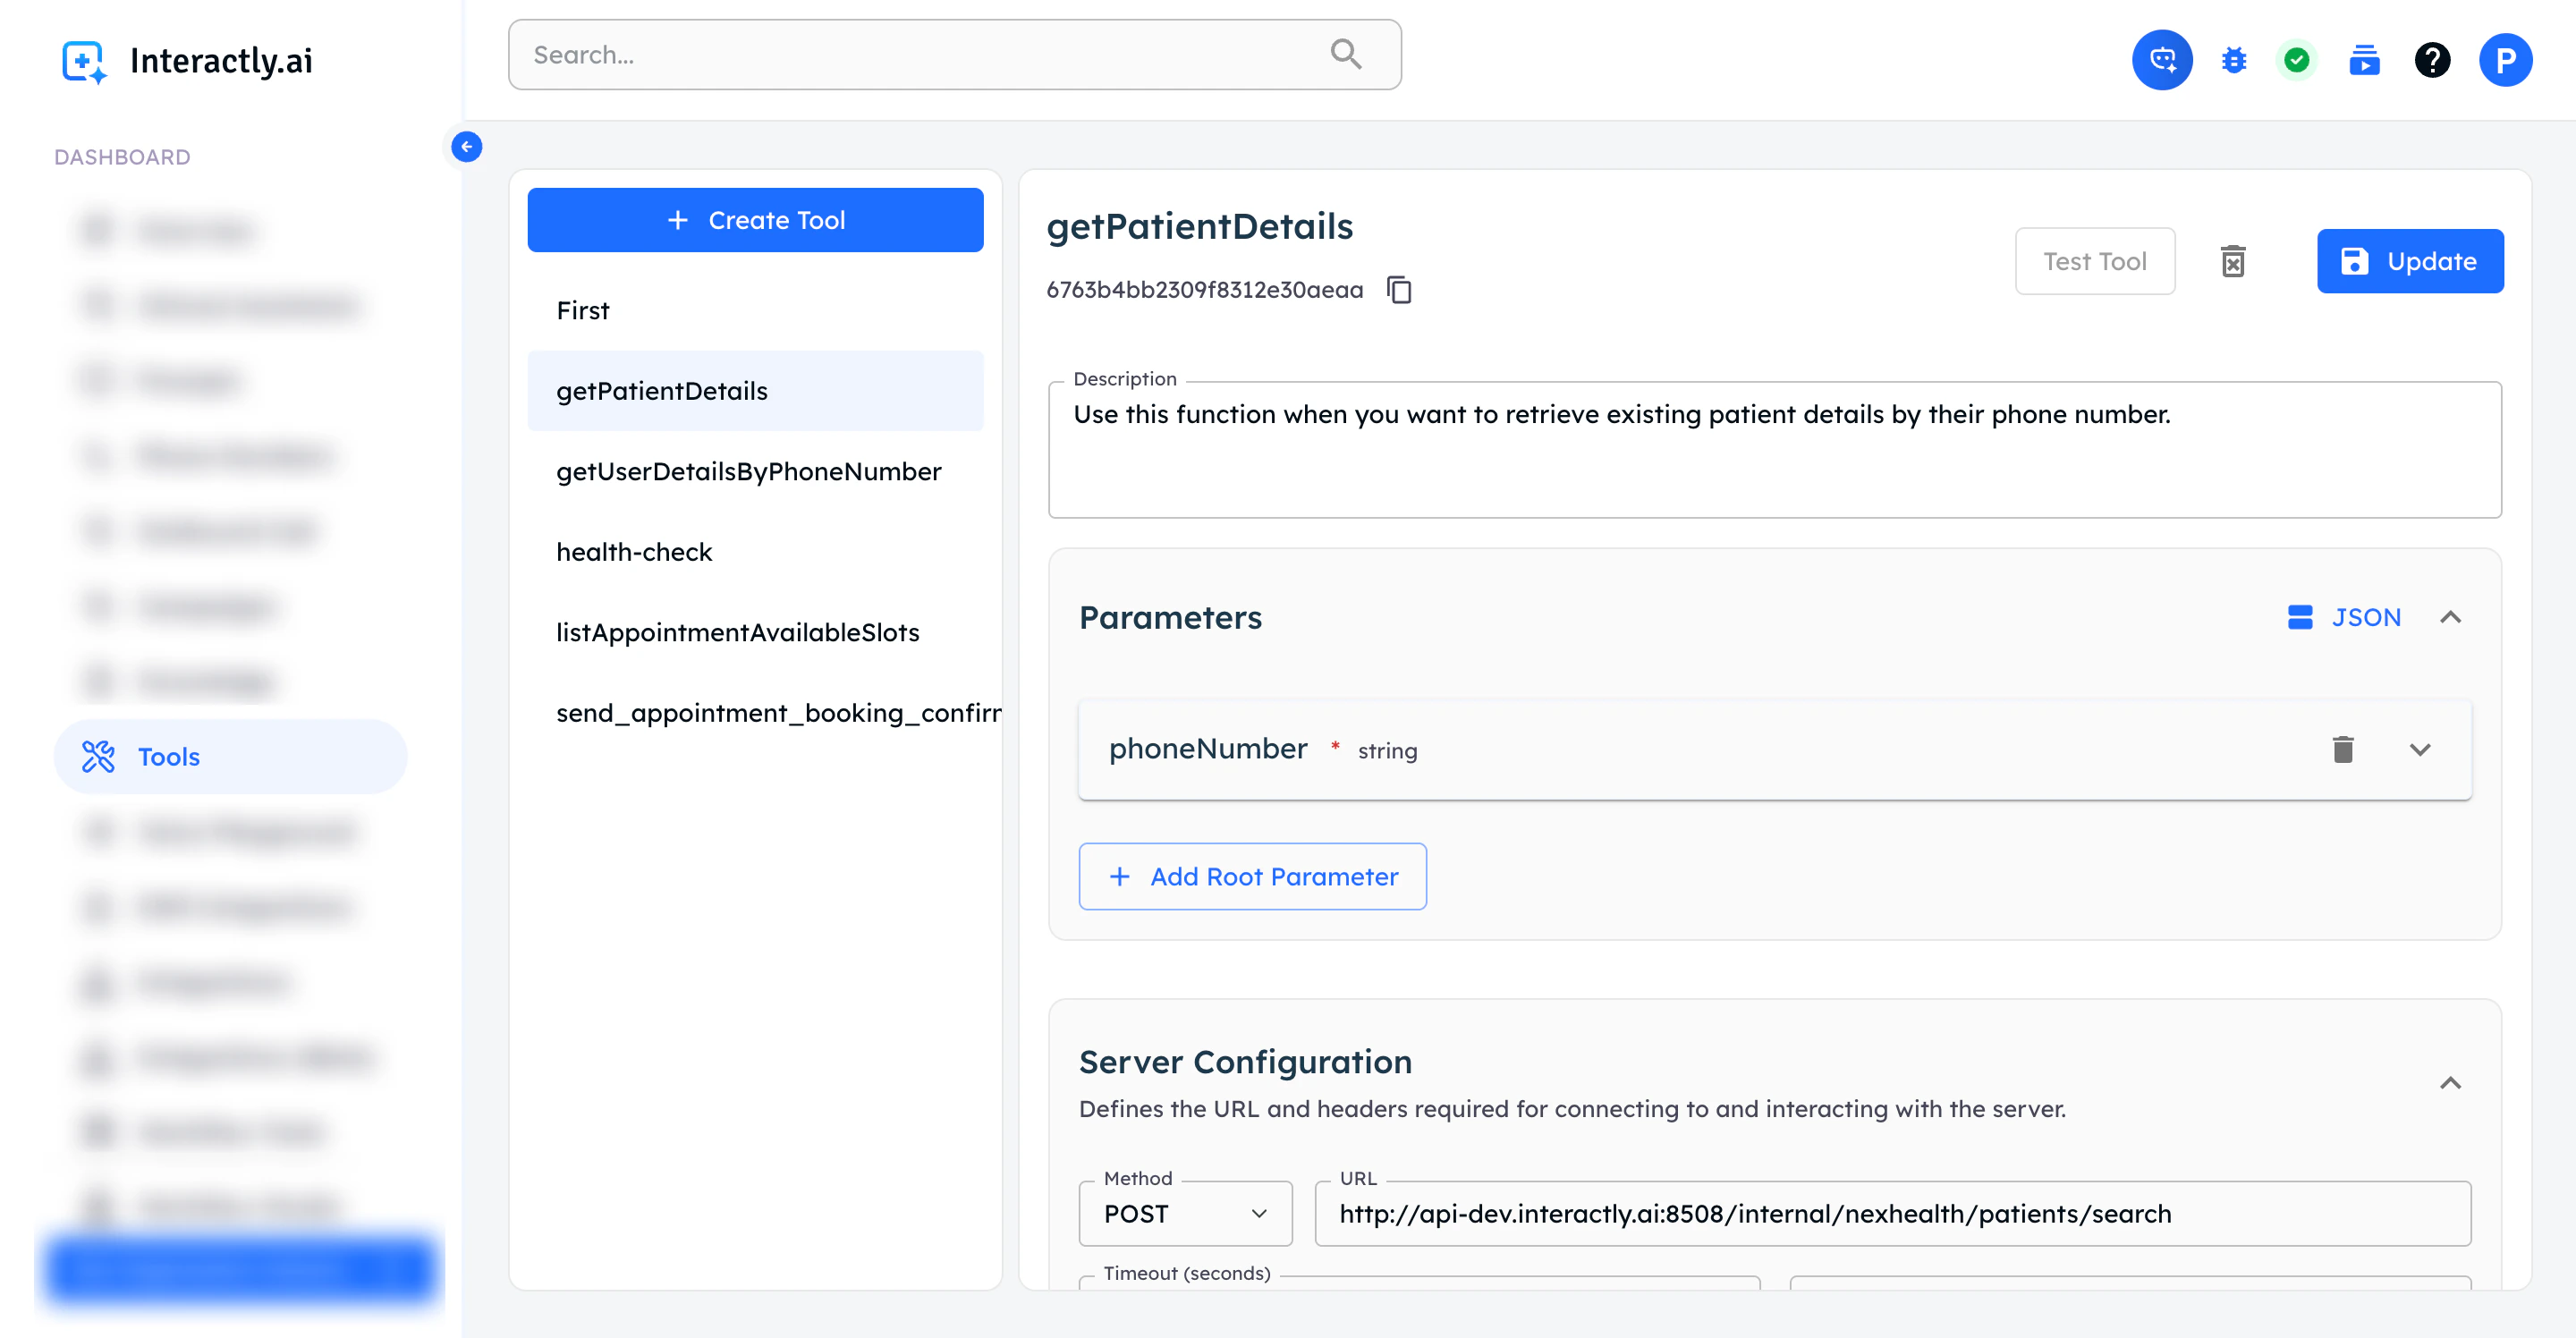 To create a custom tool integration:
1. Click **Create Tool** in the Custom Tools section
2. Configure your tool with the following:
To create a custom tool integration:
1. Click **Create Tool** in the Custom Tools section
2. Configure your tool with the following:
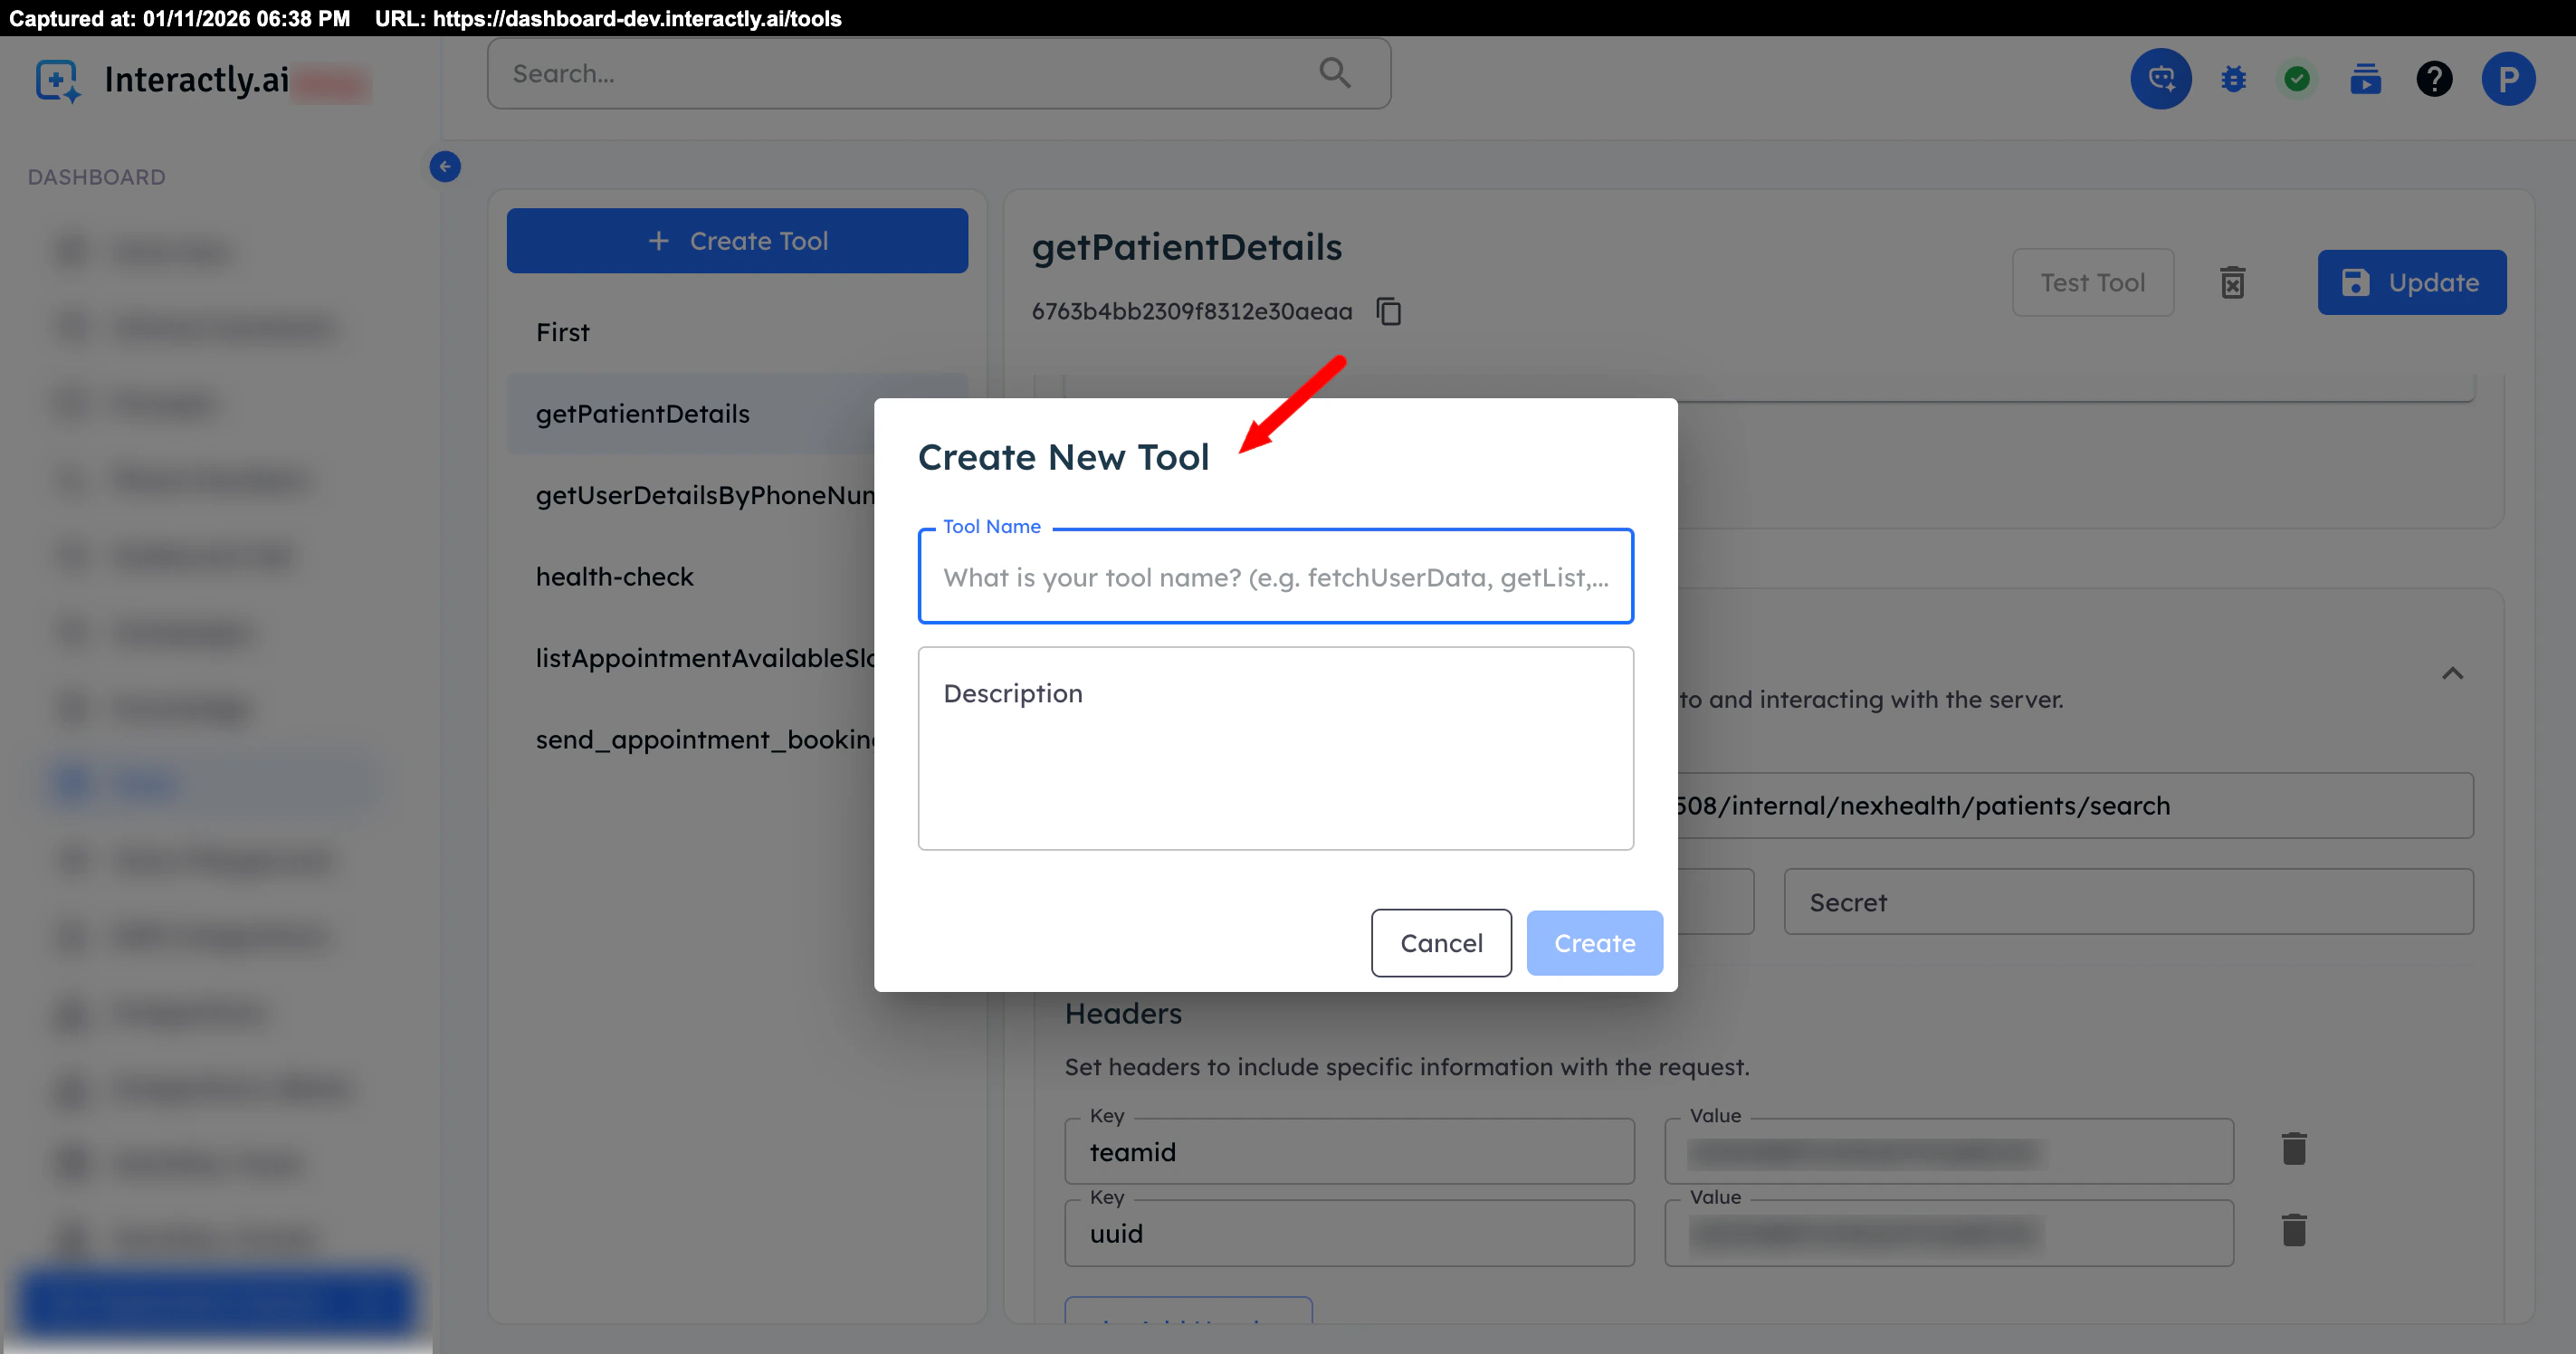 Fill in the tool configuration form:
**Function Name:**
* Use clear, descriptive names (e.g., `get_customer_info`, `book_appointment`)
* Follow naming conventions (lowercase, underscores)
* Make it identifiable and unique
**Description:**
* Explain what the tool does
* Include when it should be used
* Be specific - this helps the AI choose correctly
* Example: "Retrieves customer information including contact details, purchase history, and account status based on customer ID or phone number"
Define the inputs your tool accepts:
**For each parameter:**
* **Name**: Parameter identifier
* **Type**: string, number, boolean, object, array
* **Description**: What this parameter represents
* **Required**: Toggle if mandatory
**Example Parameter:**
* name: "customer\_id"
* type: "string"
* description: "The unique identifier for the customer"
* required: true
Fill in the tool configuration form:
**Function Name:**
* Use clear, descriptive names (e.g., `get_customer_info`, `book_appointment`)
* Follow naming conventions (lowercase, underscores)
* Make it identifiable and unique
**Description:**
* Explain what the tool does
* Include when it should be used
* Be specific - this helps the AI choose correctly
* Example: "Retrieves customer information including contact details, purchase history, and account status based on customer ID or phone number"
Define the inputs your tool accepts:
**For each parameter:**
* **Name**: Parameter identifier
* **Type**: string, number, boolean, object, array
* **Description**: What this parameter represents
* **Required**: Toggle if mandatory
**Example Parameter:**
* name: "customer\_id"
* type: "string"
* description: "The unique identifier for the customer"
* required: true
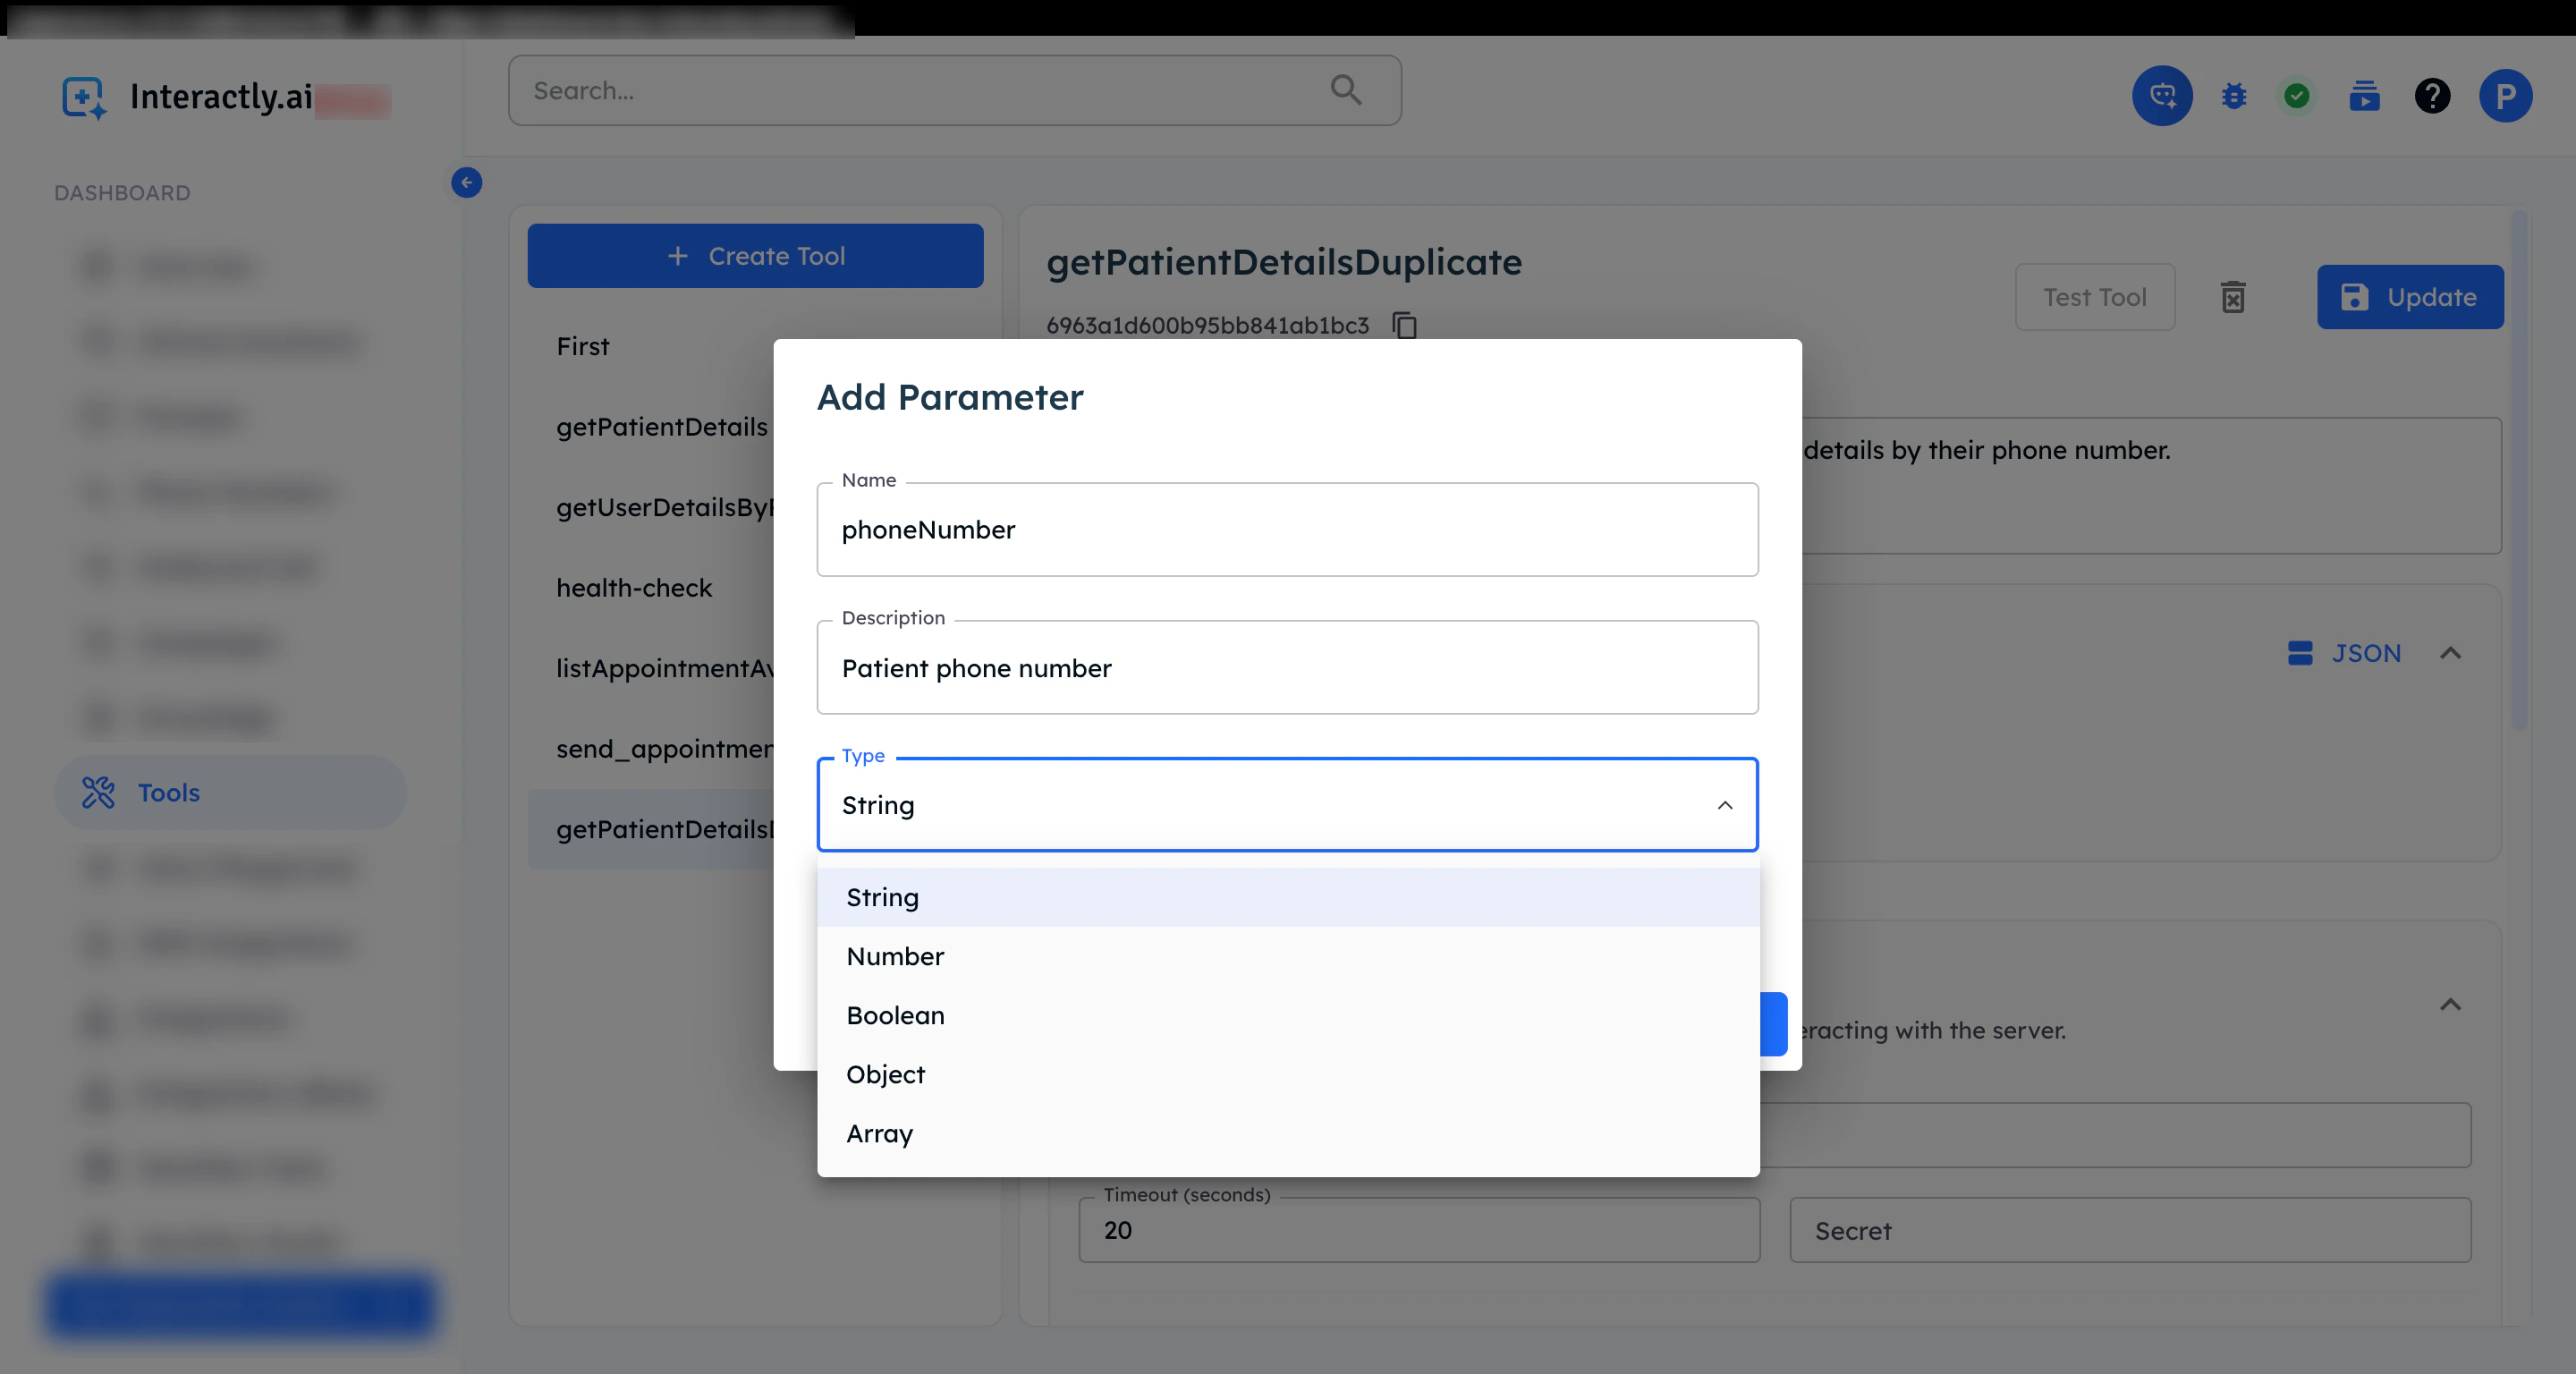 Click **Add Root Parameter** to define each input field your tool needs:
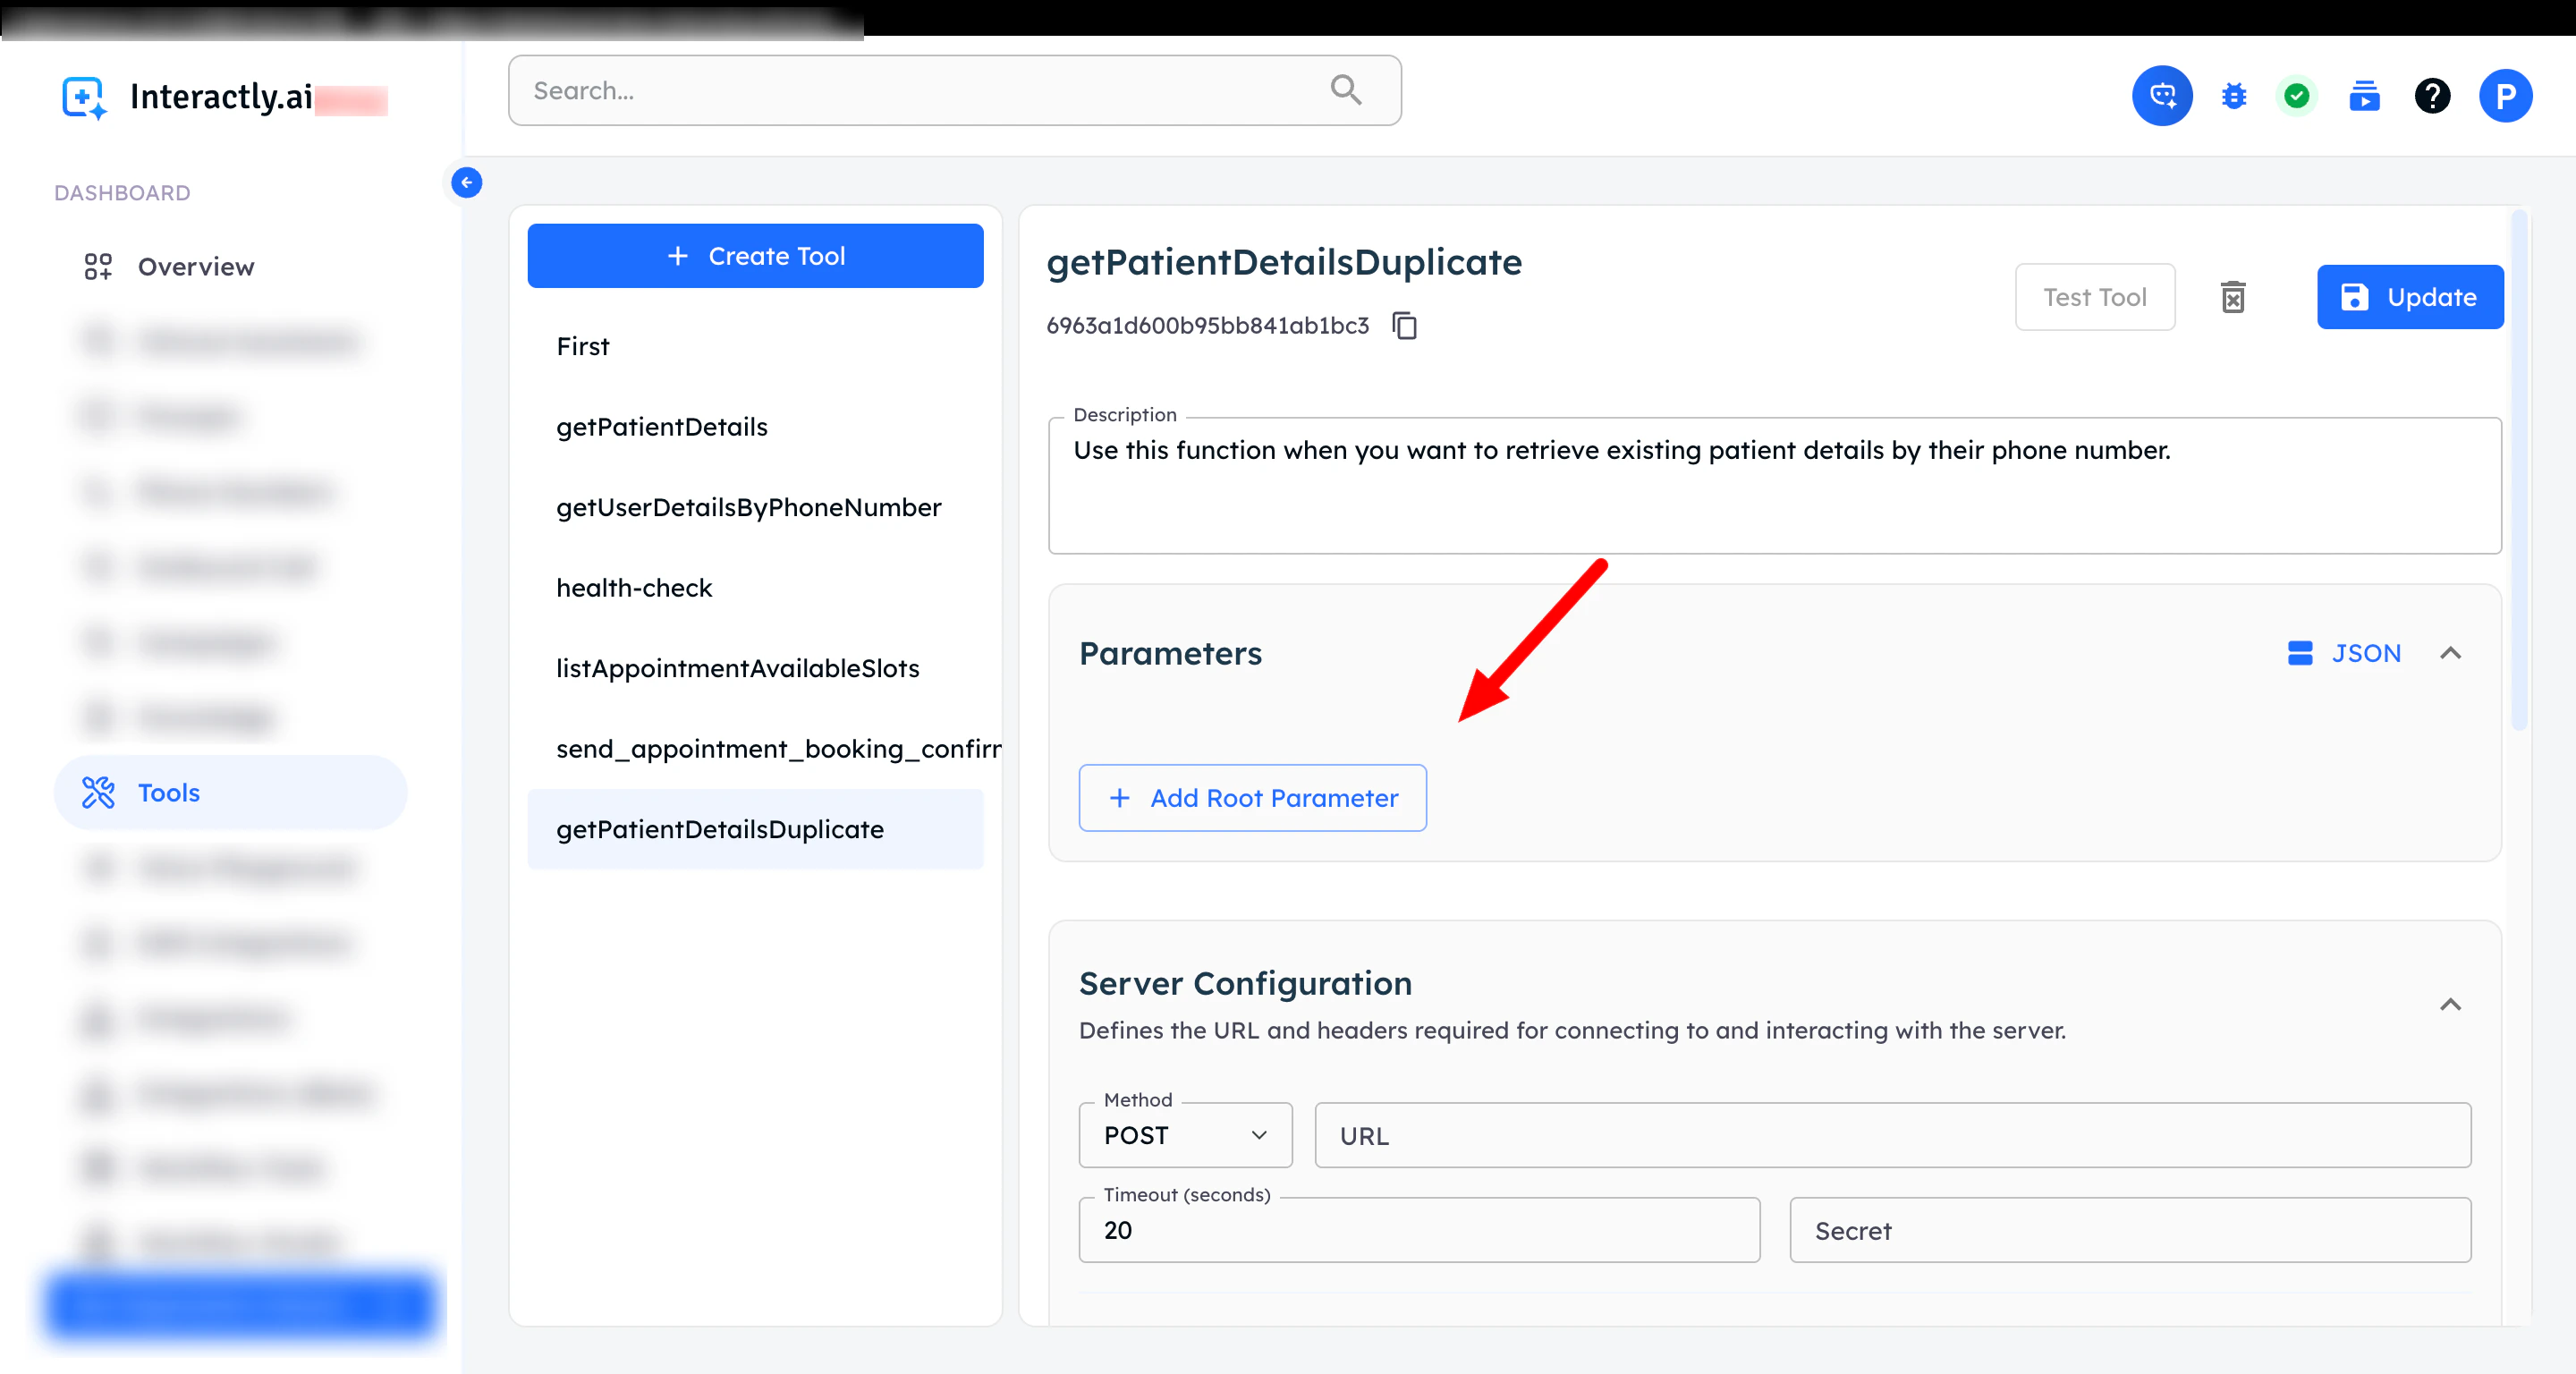
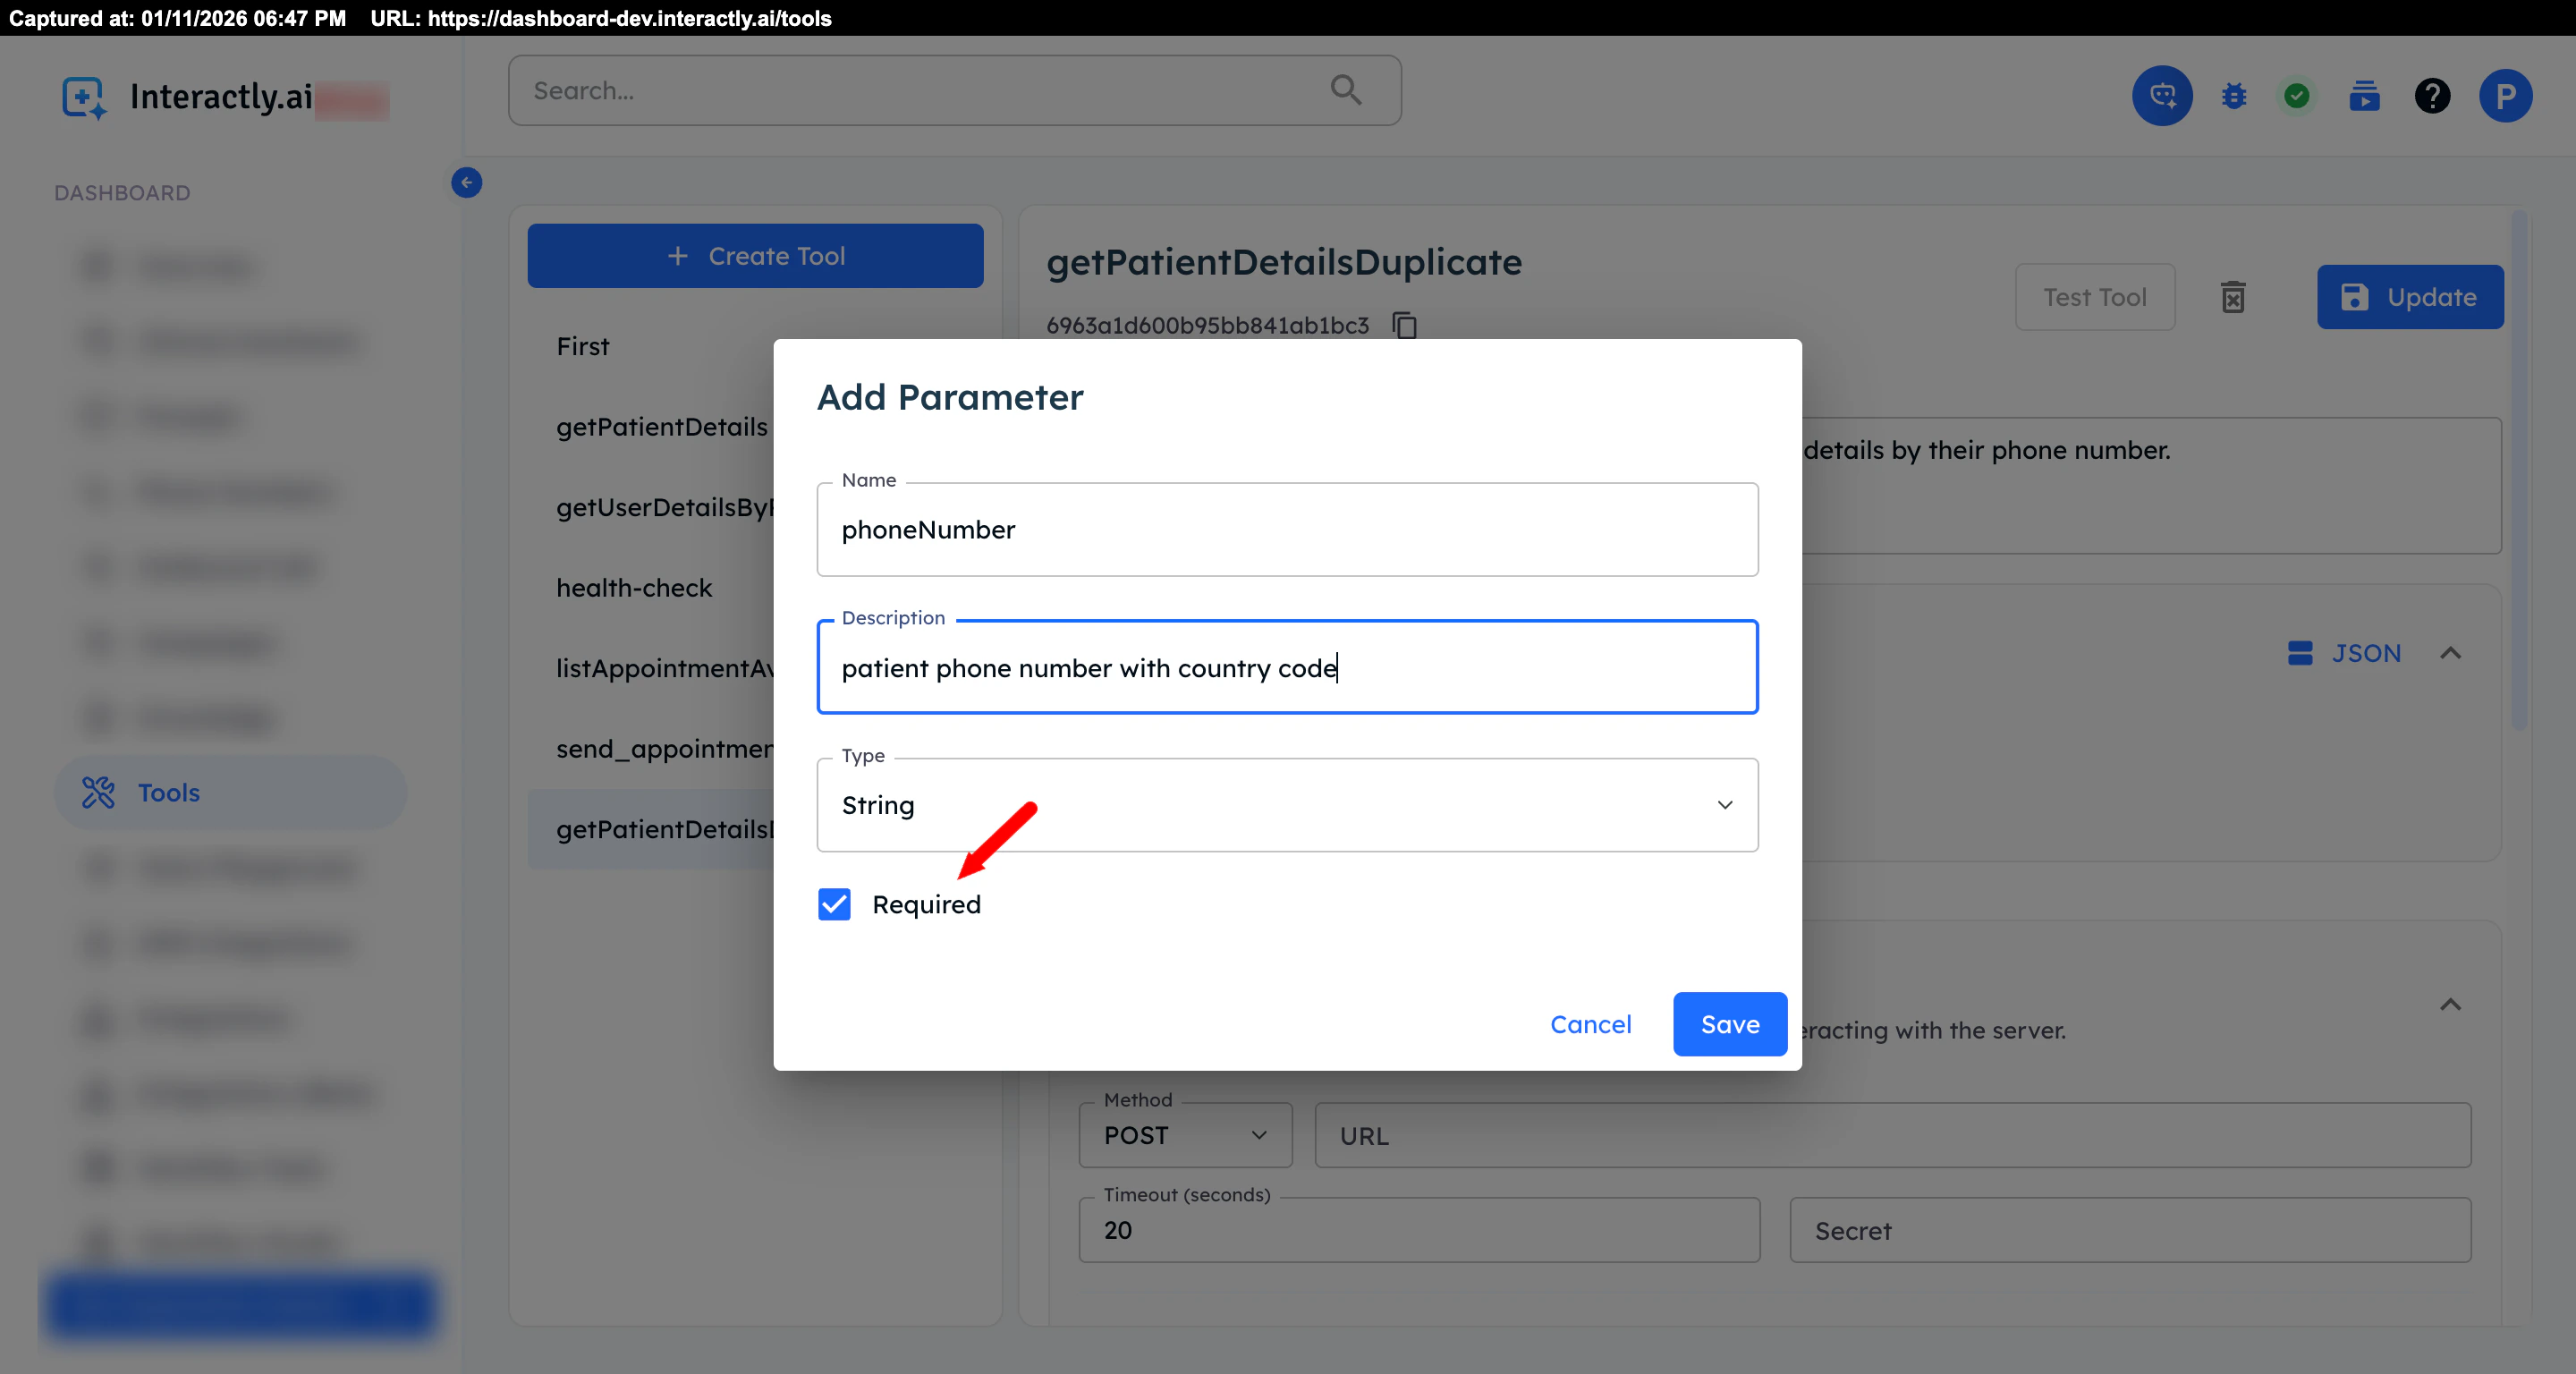 * **Be descriptive**: Clear descriptions help the AI extract correct values
* **Use appropriate types**: Match data types to your expected inputs
* **Mark required fields**: Ensure critical data is always provided
* **Save**: Save each parameter after adding
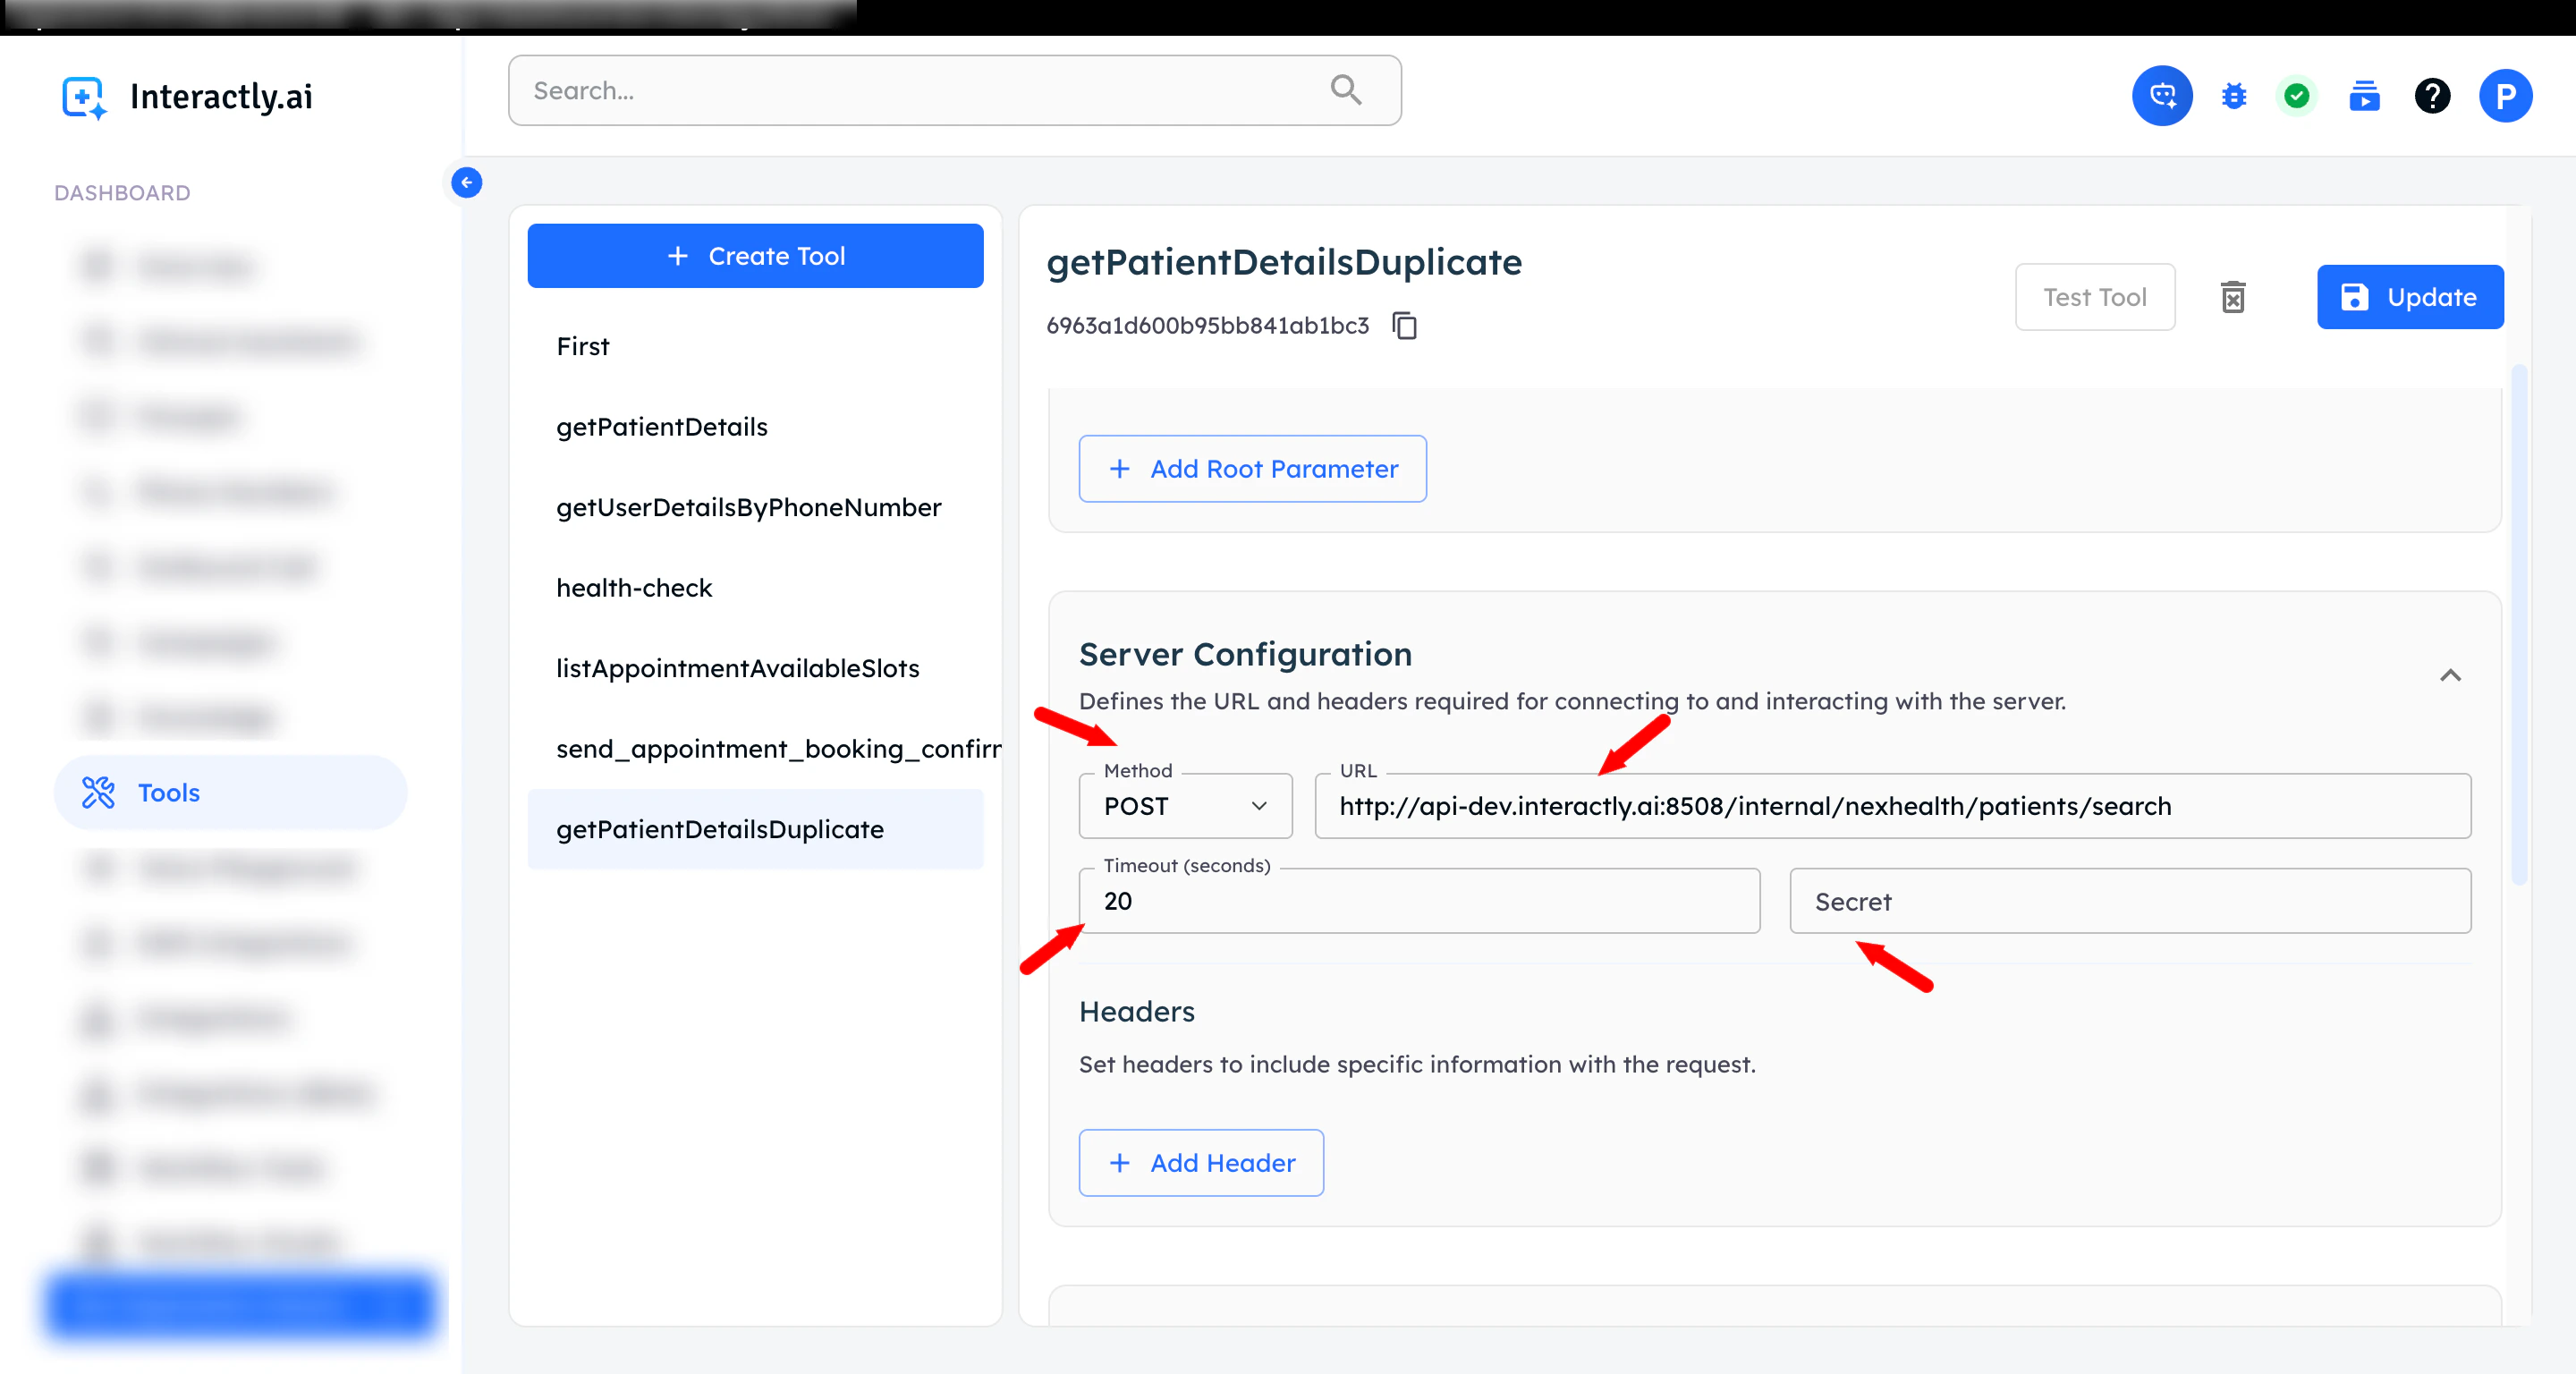
Your tool needs a backend endpoint to handle requests:
1. Add the URL of your server endpoint that will process tool calls
2. Ensure your endpoint serves with correct method (e.g., POST)
3. Set the timeout and authentication as needed
* **Be descriptive**: Clear descriptions help the AI extract correct values
* **Use appropriate types**: Match data types to your expected inputs
* **Mark required fields**: Ensure critical data is always provided
* **Save**: Save each parameter after adding
Your tool needs a backend endpoint to handle requests:
1. Add the URL of your server endpoint that will process tool calls
2. Ensure your endpoint serves with correct method (e.g., POST)
3. Set the timeout and authentication as needed
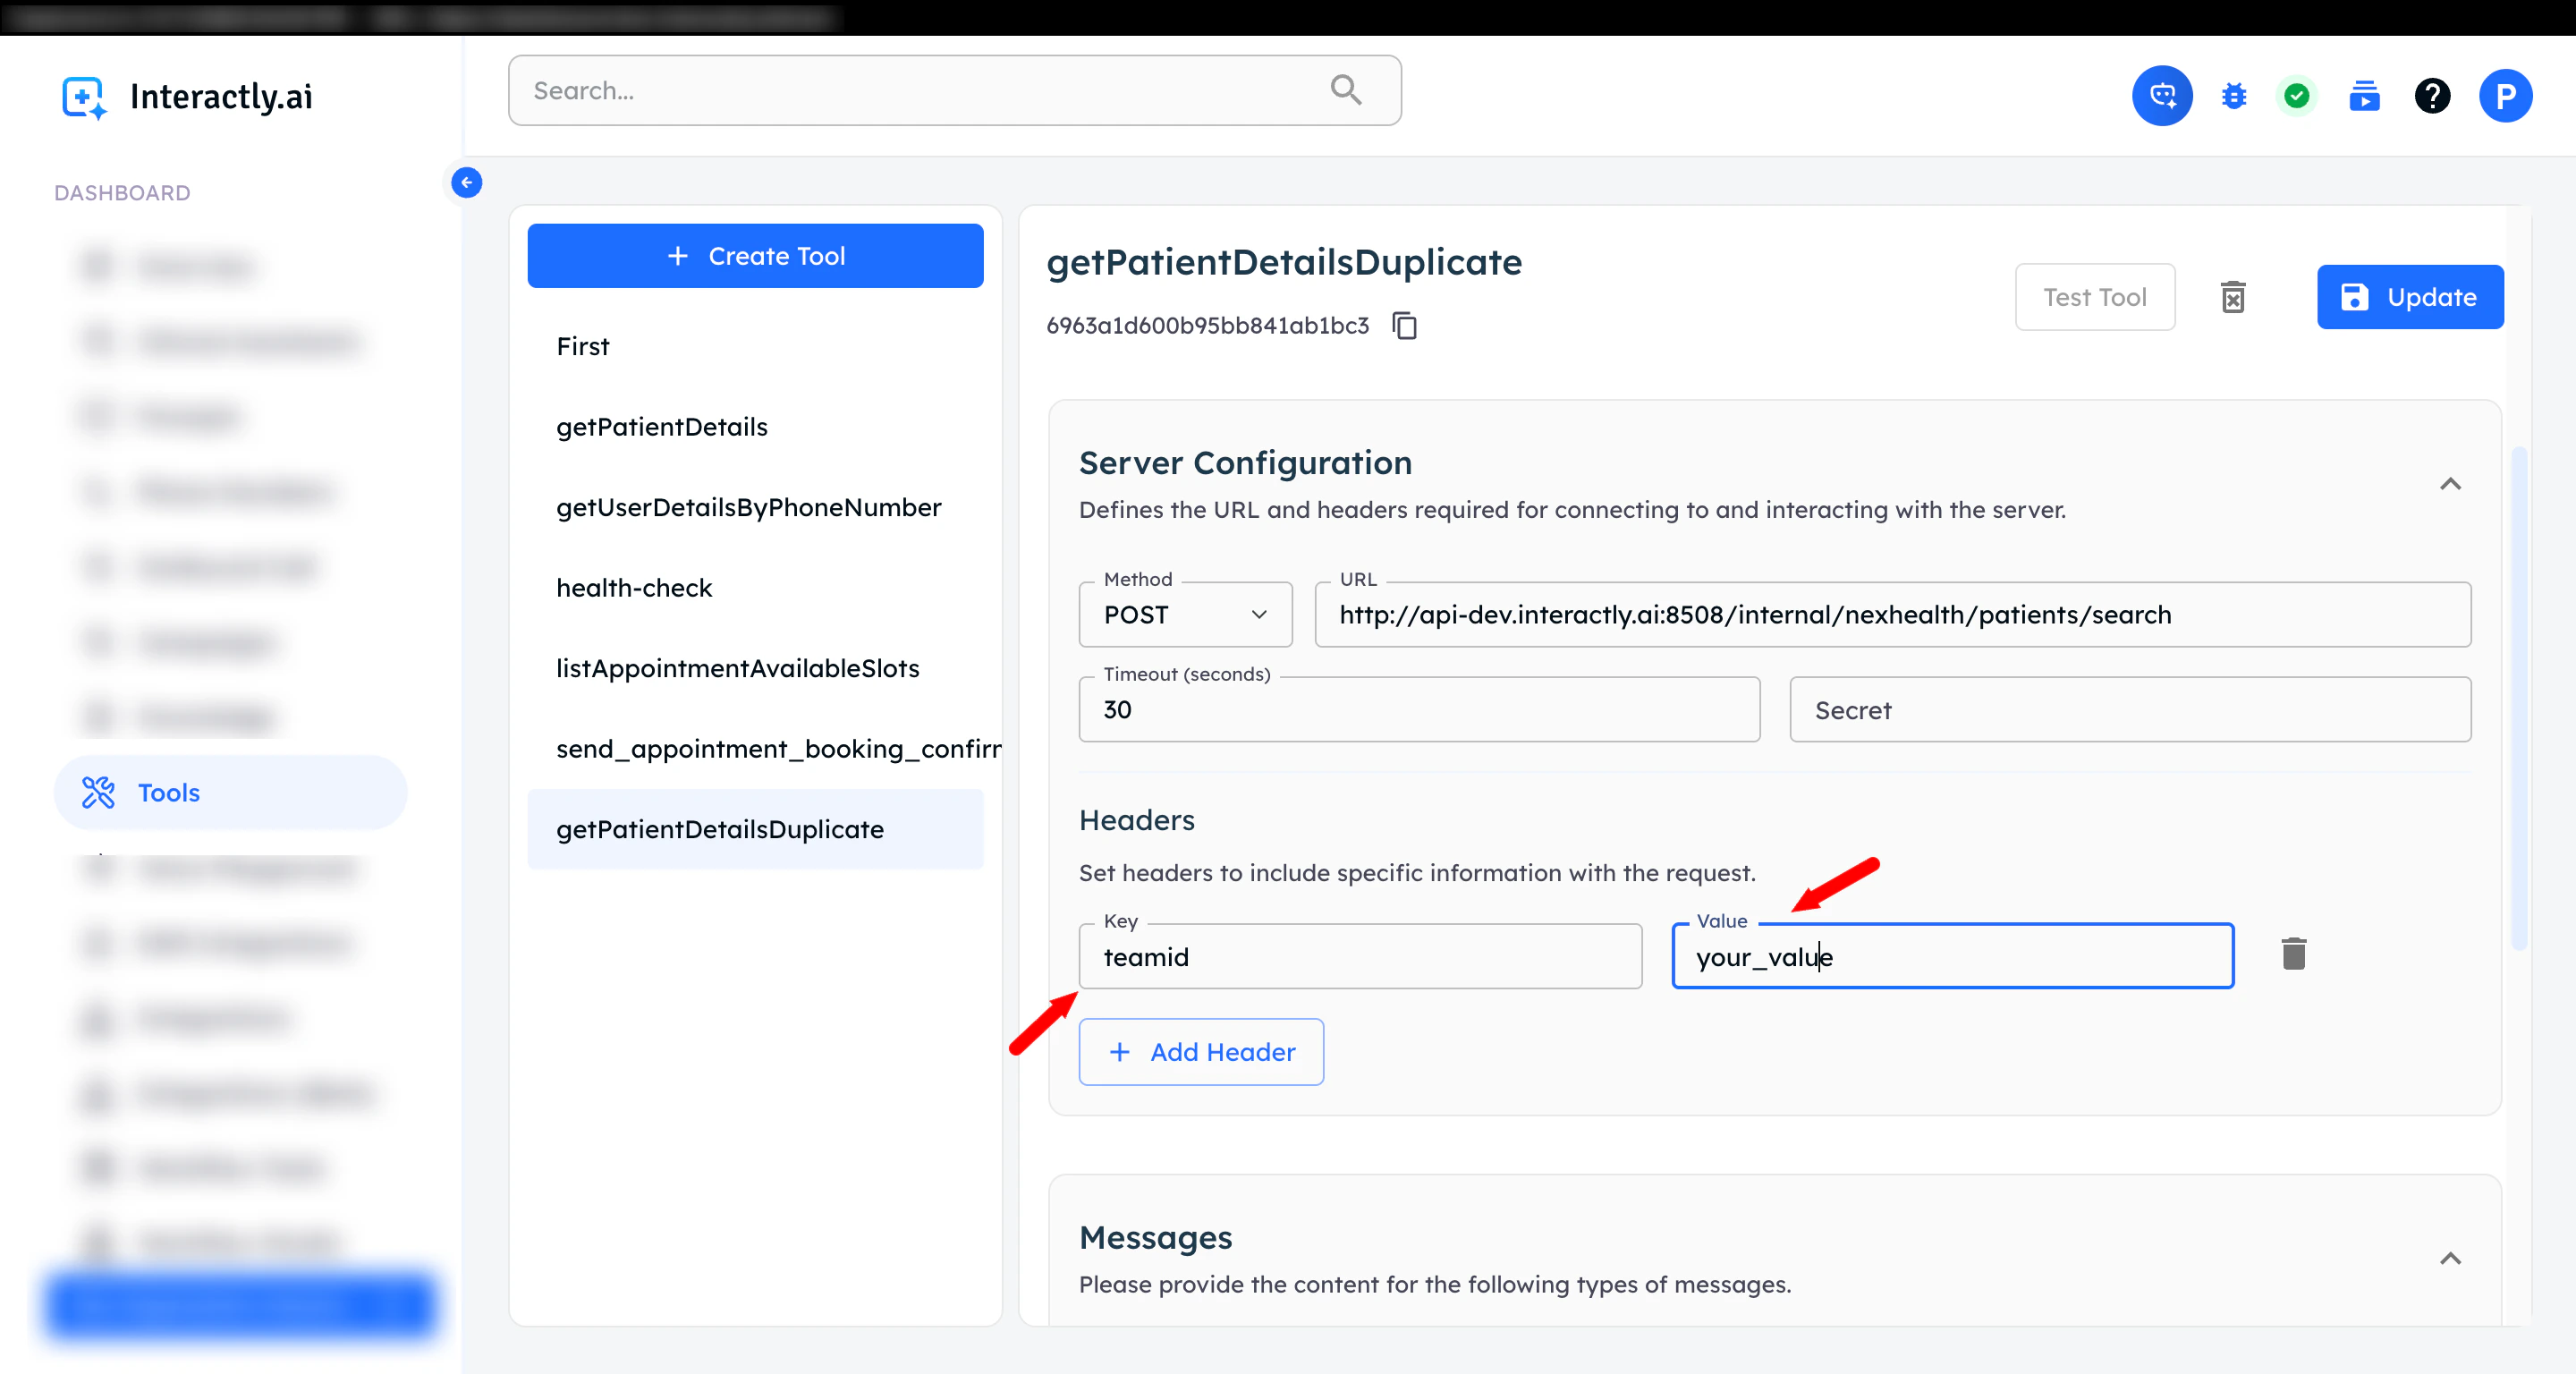
 Keep API keys and sensitive credentials secure.
If your tool requires authentication or custom headers:
1. Expand the **Headers** section
2. Add header key-value pairs for:
* API authentication tokens
* Content-Type specifications
* Custom headers required by your API
Keep API keys and sensitive credentials secure.
If your tool requires authentication or custom headers:
1. Expand the **Headers** section
2. Add header key-value pairs for:
* API authentication tokens
* Content-Type specifications
* Custom headers required by your API
 Keep sensitive headers secure.
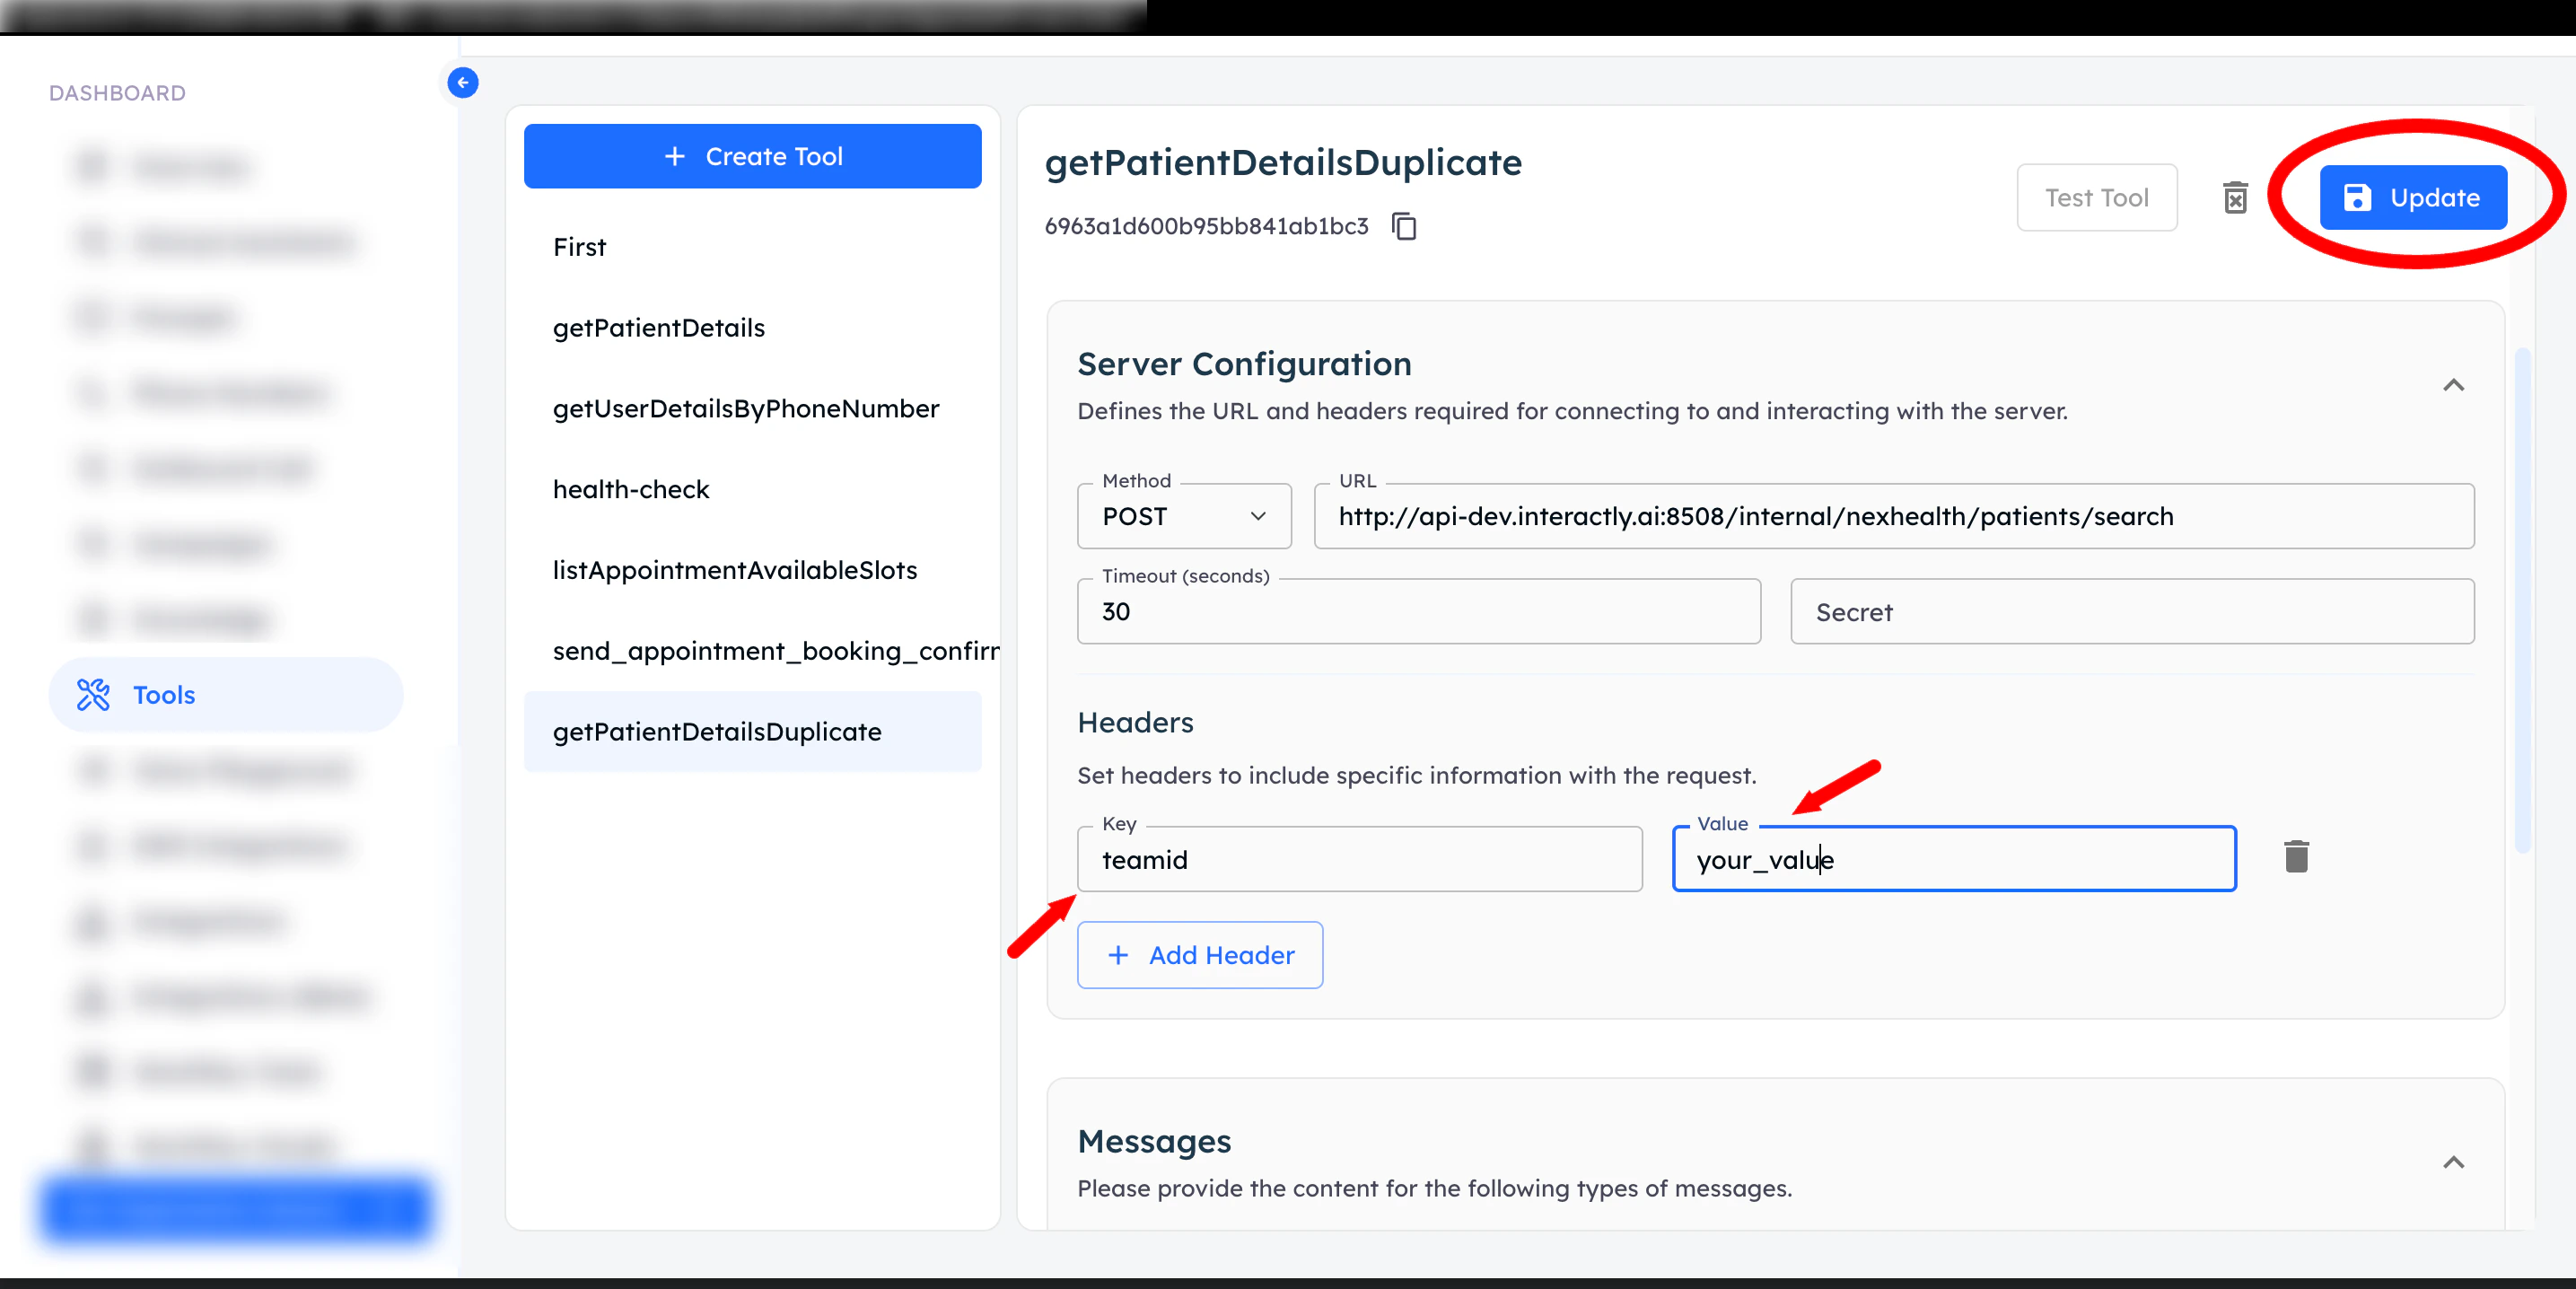
Review your tool configuration:
Verify:
* ✅ Function name is clear and unique
* ✅ Description accurately explains functionality
* ✅ All required parameters are defined
* ✅ Parameter types are correct
* ✅ Headers are configured if needed
Click **Update** to save the tool.
Keep sensitive headers secure.
Review your tool configuration:
Verify:
* ✅ Function name is clear and unique
* ✅ Description accurately explains functionality
* ✅ All required parameters are defined
* ✅ Parameter types are correct
* ✅ Headers are configured if needed
Click **Update** to save the tool.
 After creation, you can:
* **Edit**: Update tool configuration
* **Delete**: Remove unused tools
* **Enable/Disable**: Toggle tool availability
* **Test**: Verify tool functionality
To attach tools to your AI assistants:
1. Naviagate to **Clinical Assistants** section
2. Select your assistant
3. Go to the **Functions** tab
After creation, you can:
* **Edit**: Update tool configuration
* **Delete**: Remove unused tools
* **Enable/Disable**: Toggle tool availability
* **Test**: Verify tool functionality
To attach tools to your AI assistants:
1. Naviagate to **Clinical Assistants** section
2. Select your assistant
3. Go to the **Functions** tab
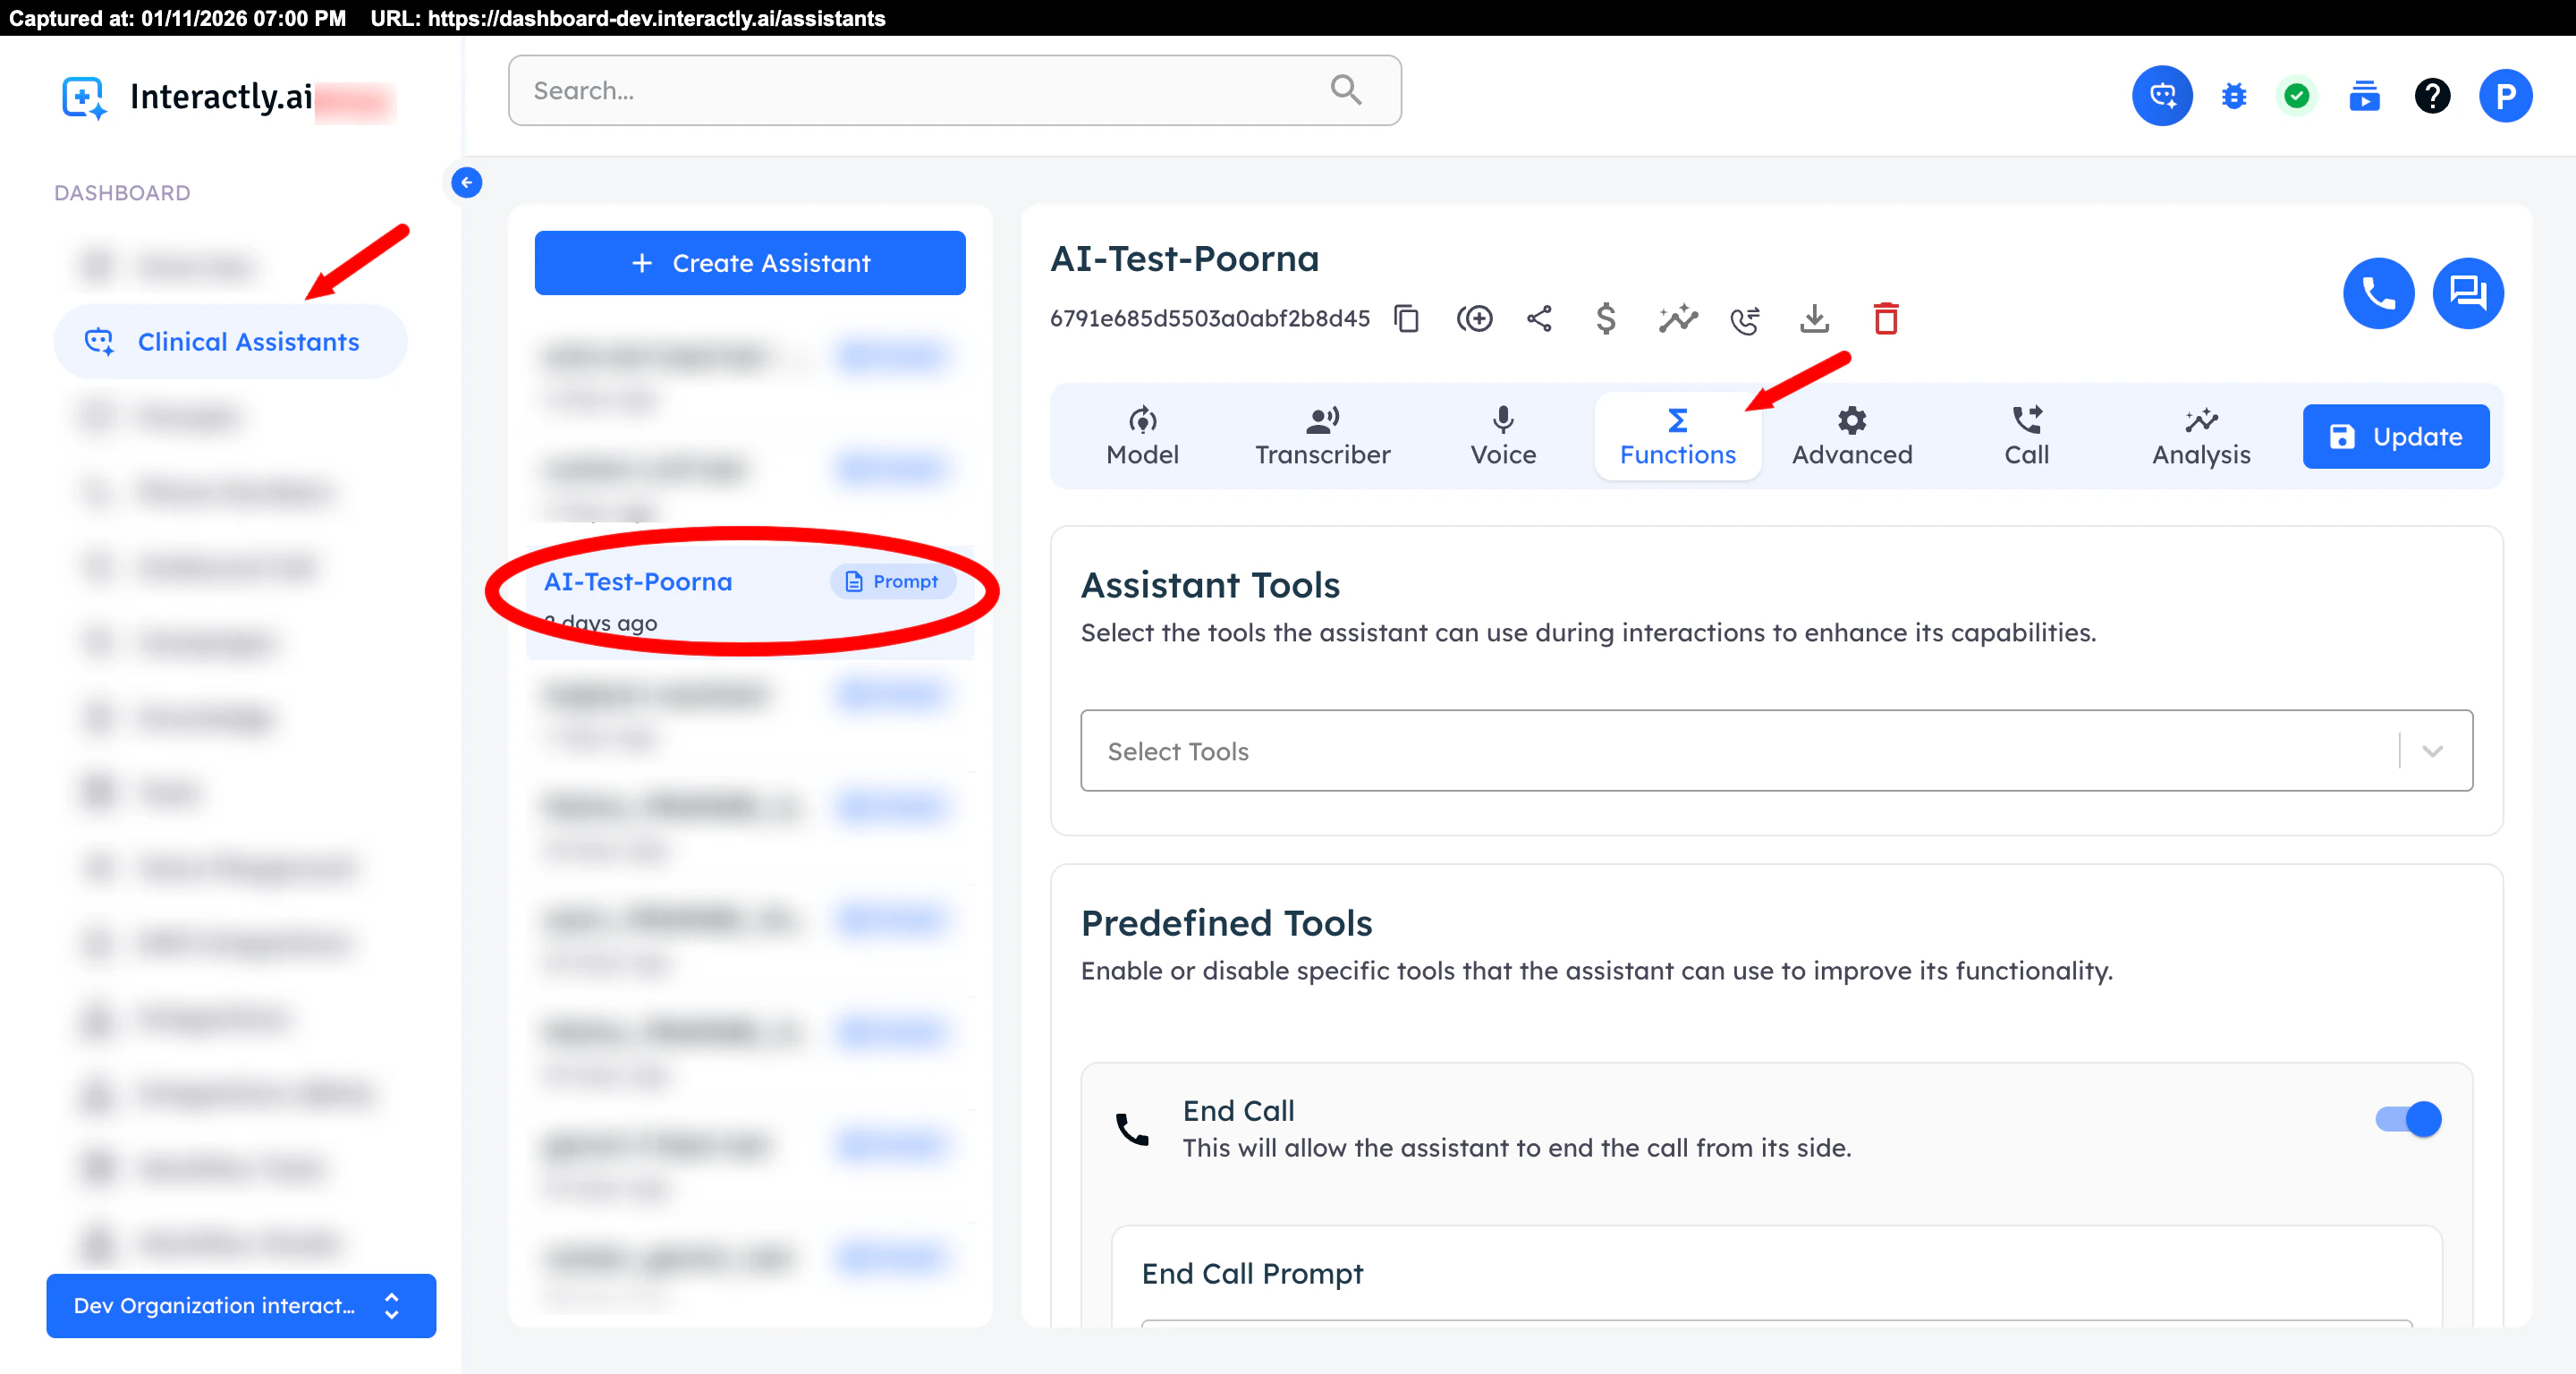 Changes to tools are applied immediately to your assistant.
Now you can see all available tools and assign them to your assistant:
Changes to tools are applied immediately to your assistant.
Now you can see all available tools and assign them to your assistant:
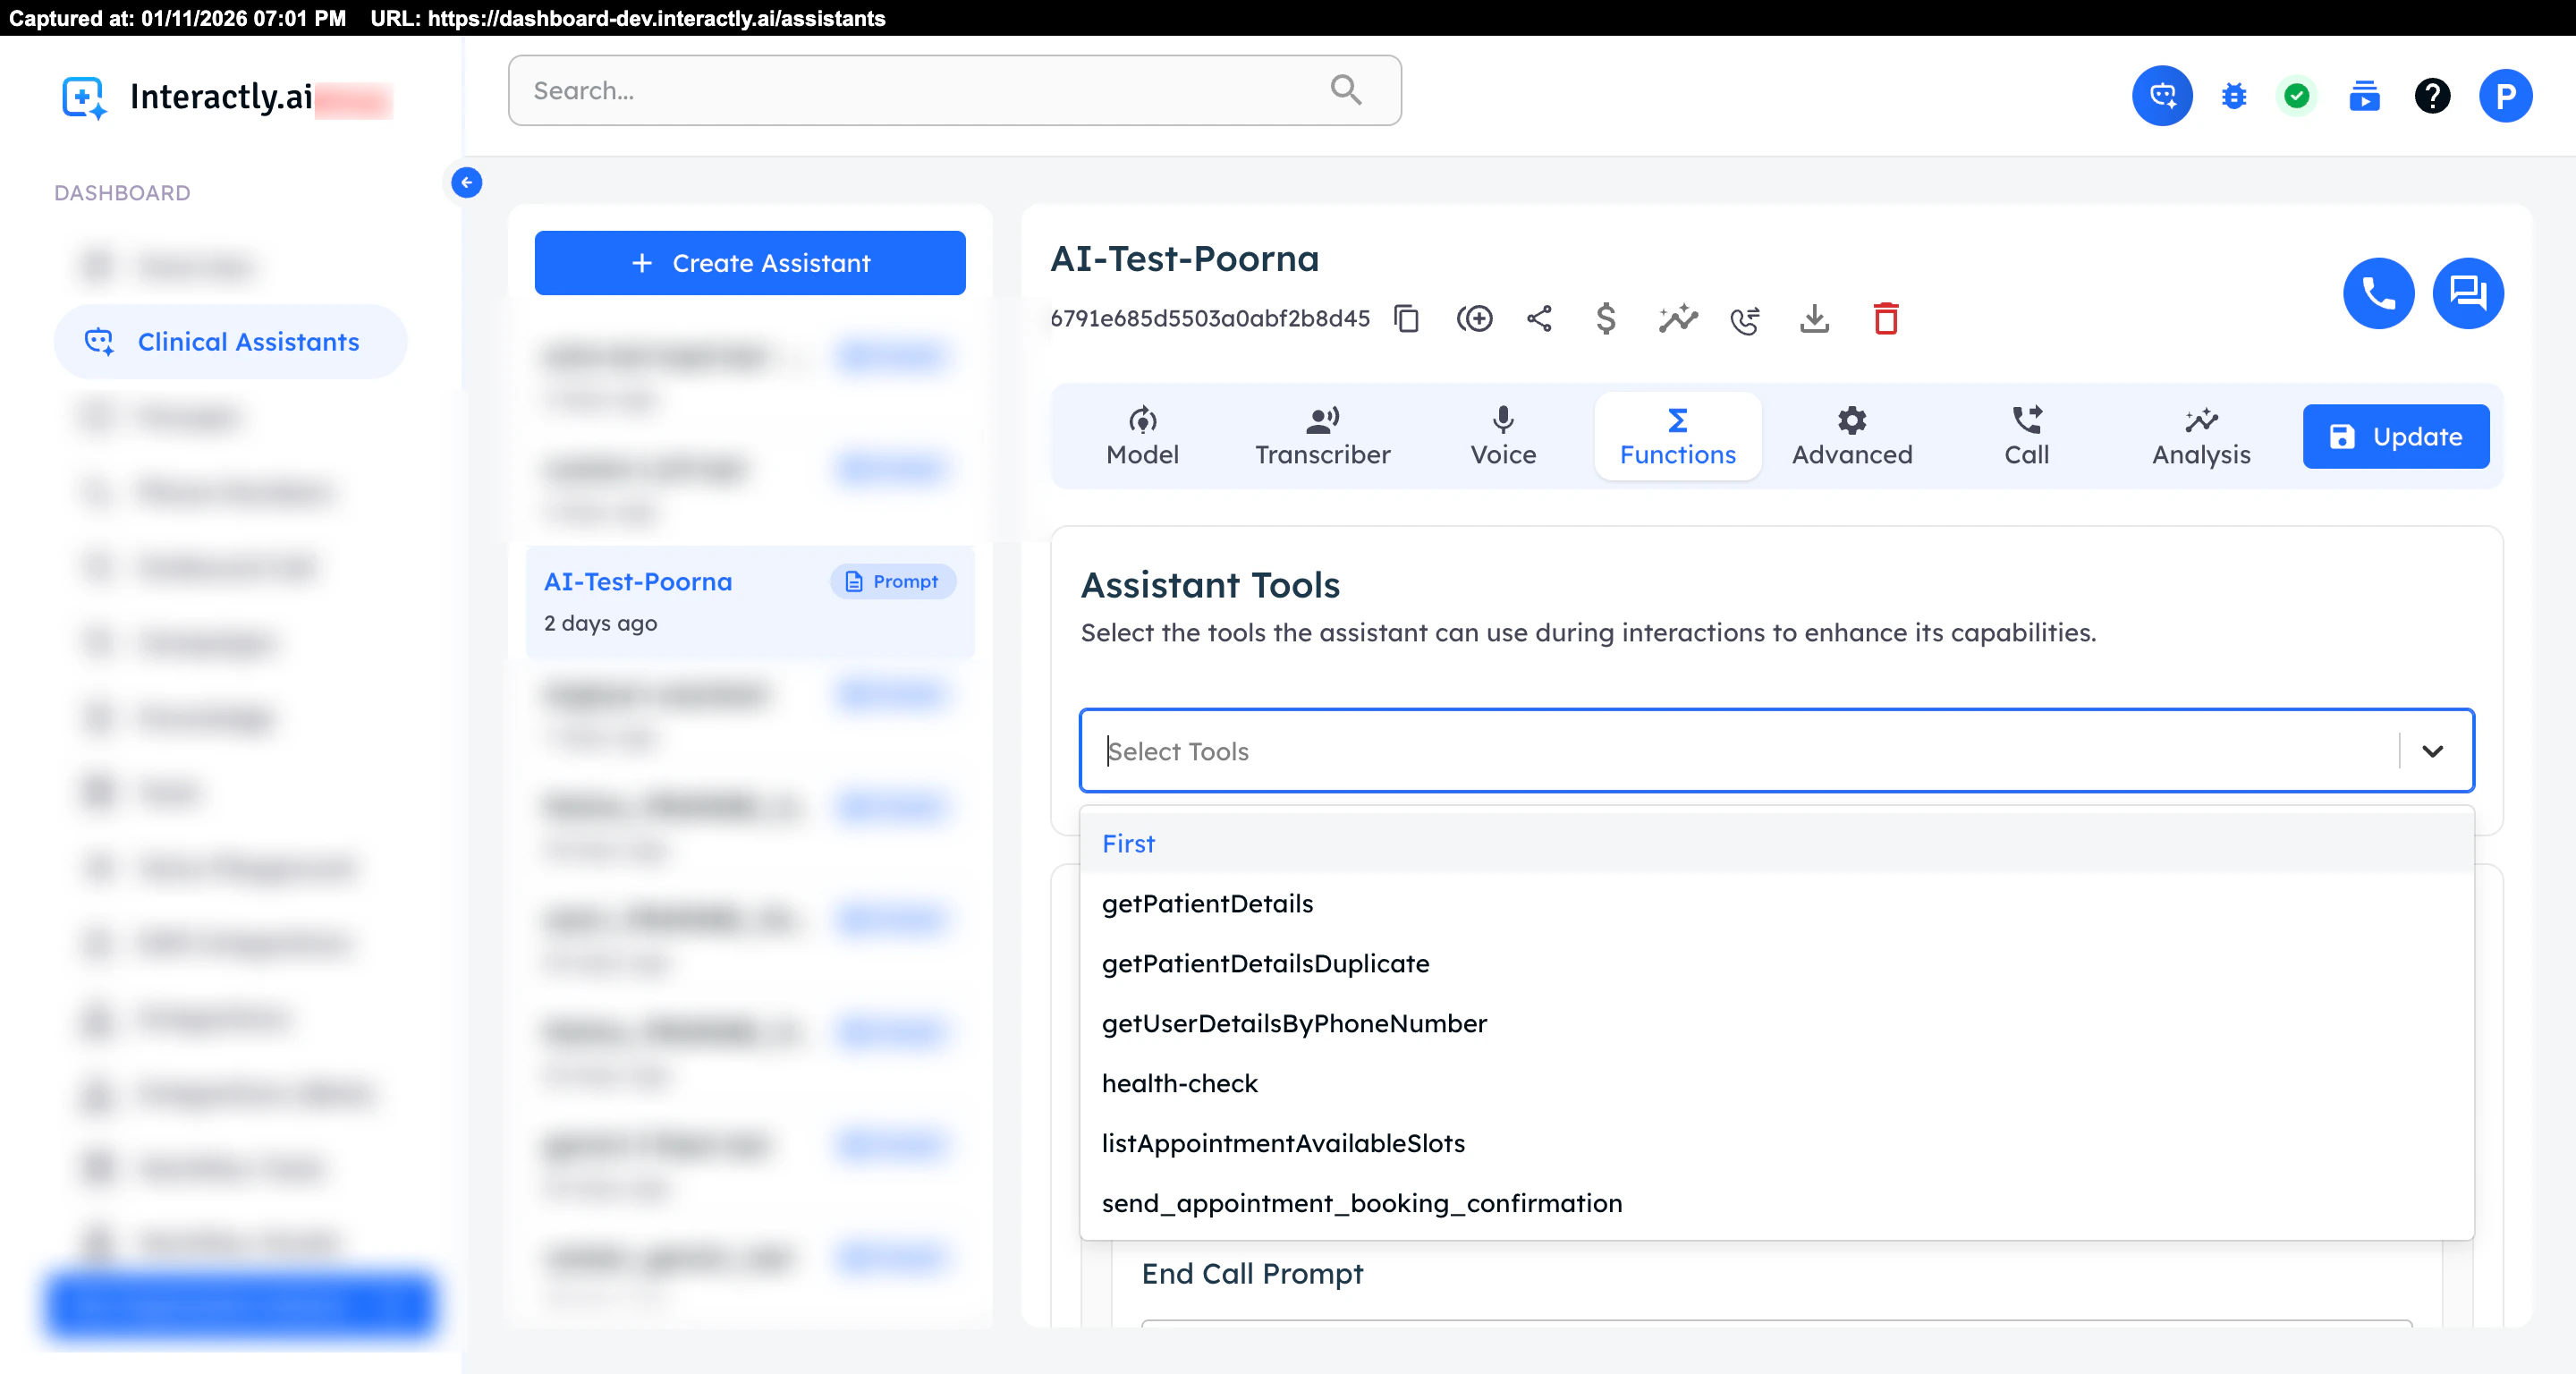 * **List of tools**: You can assign multiple tools to one assistant
* **Select Tools**: select which tools to enable for this assistant
Update the assistant to apply tool changes:
* **List of tools**: You can assign multiple tools to one assistant
* **Select Tools**: select which tools to enable for this assistant
Update the assistant to apply tool changes:
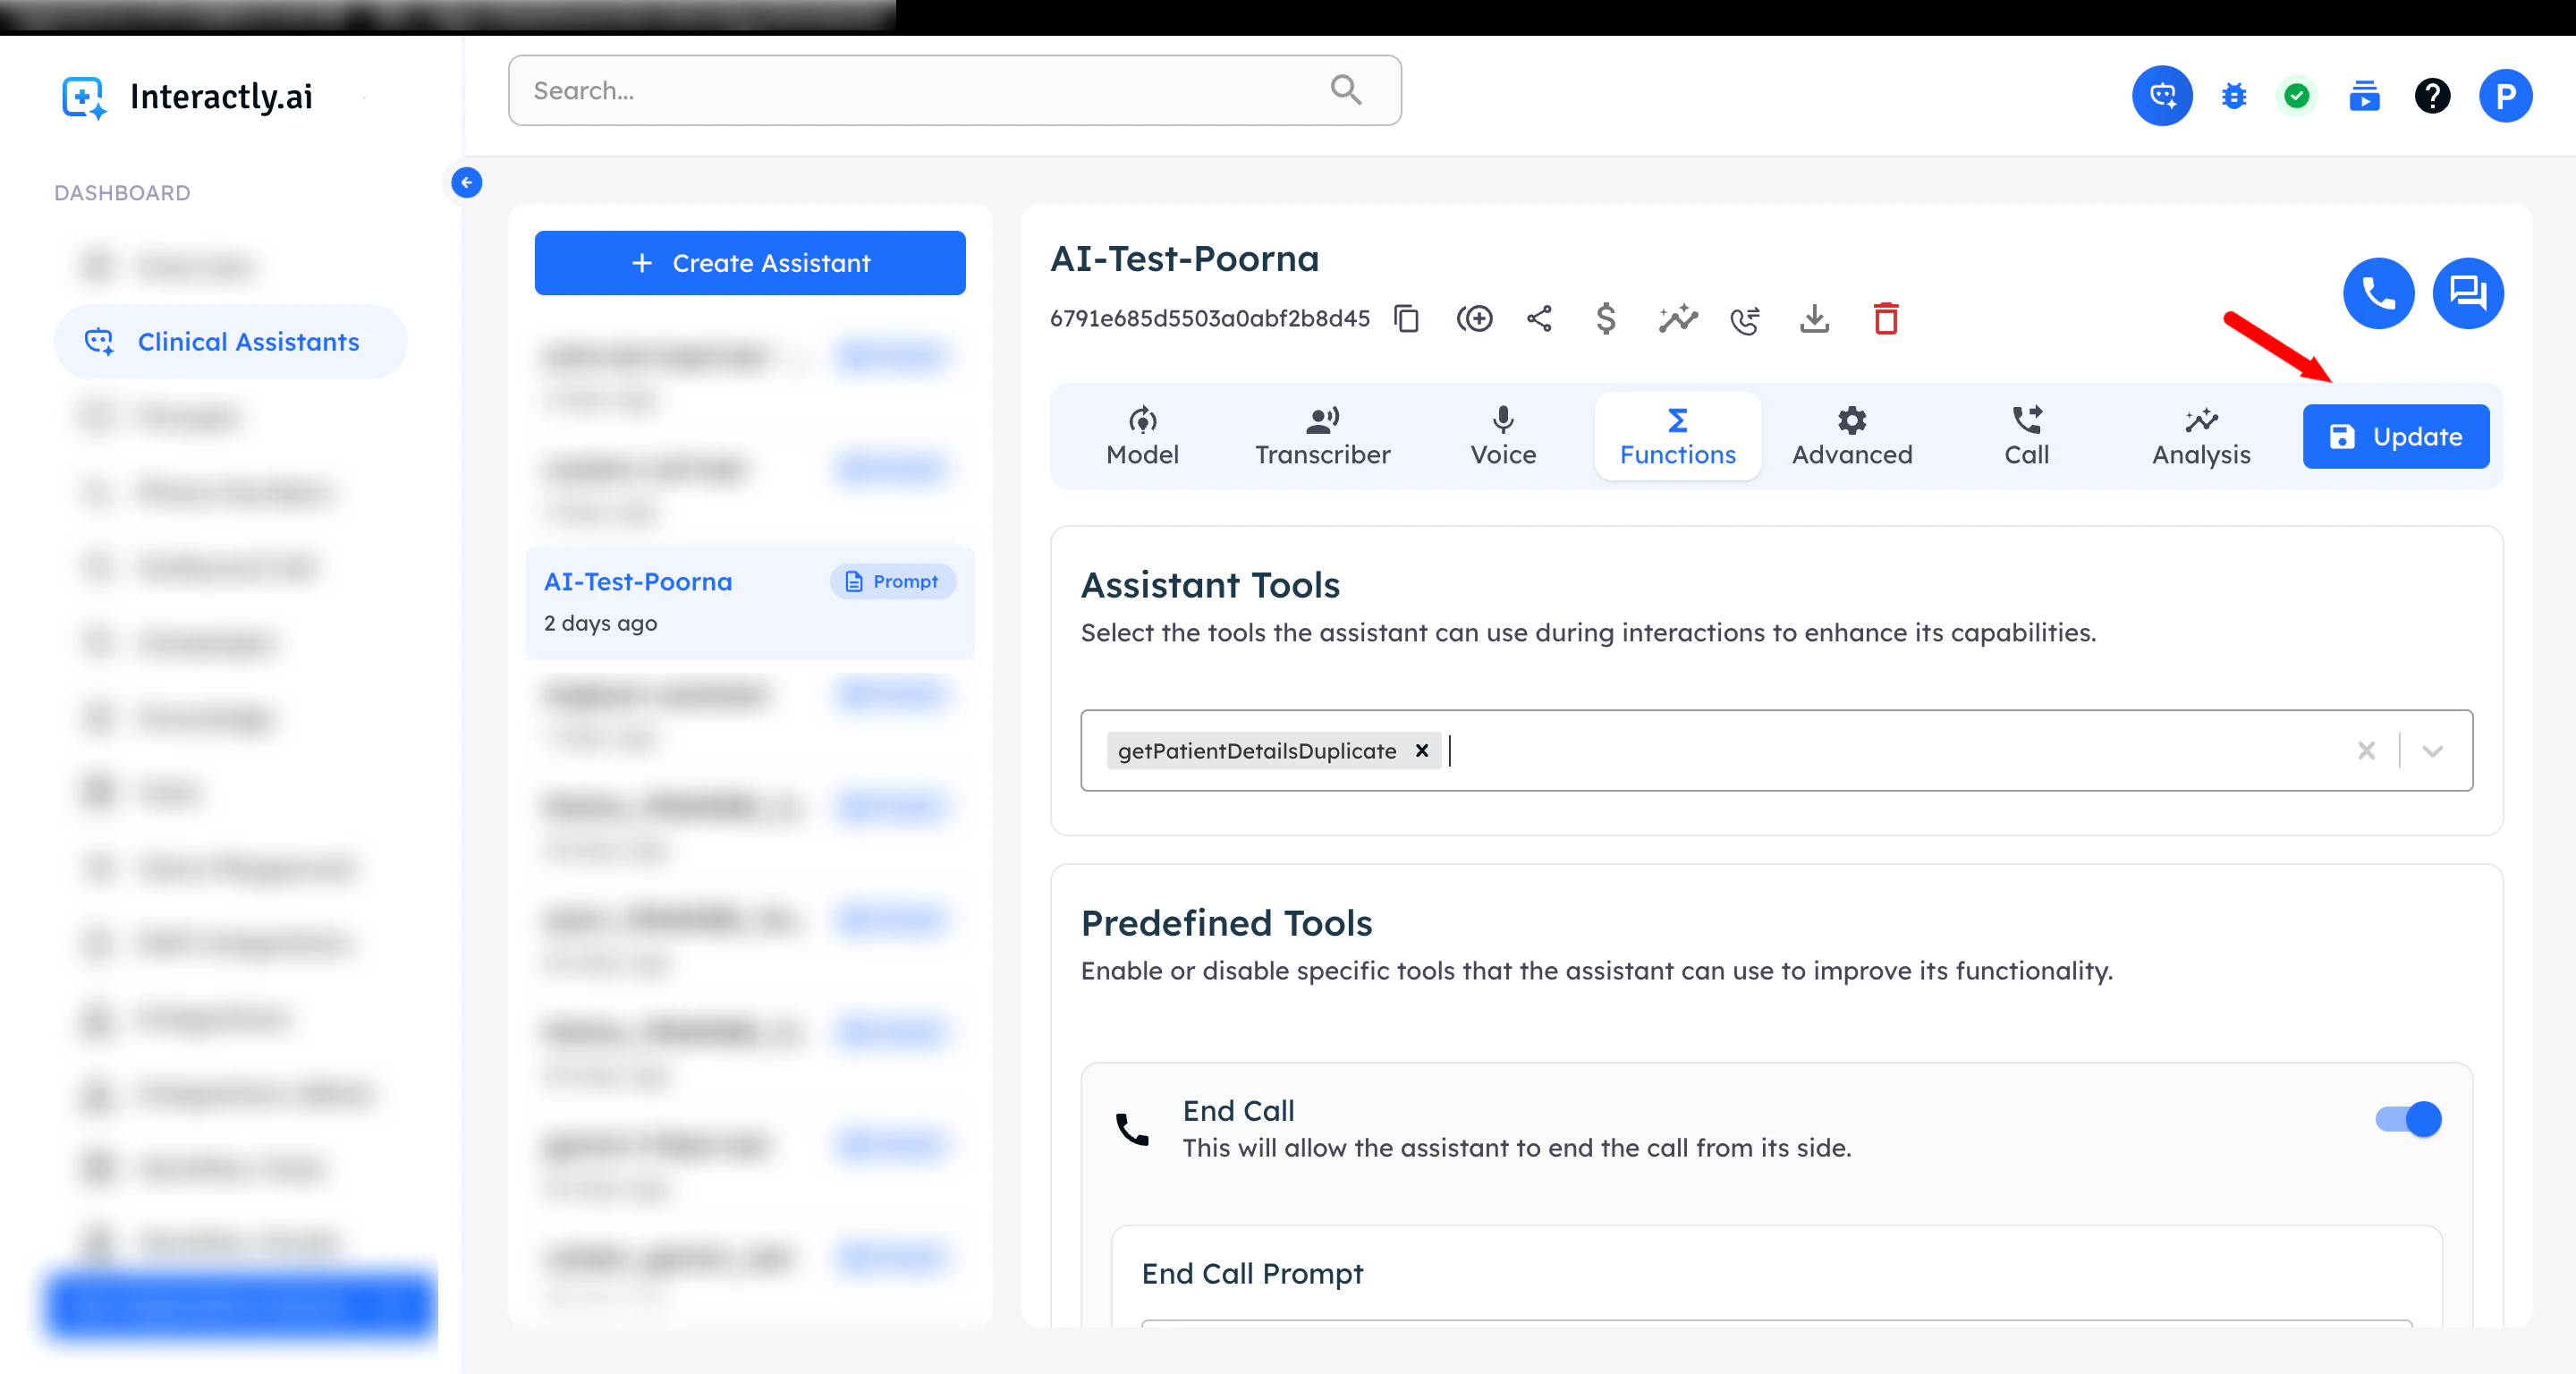 * **Update Assistant**: Click **Update** to save changes
## Tool Execution Flow
Understanding how tools work during conversations:
During a call, the user asks something that requires tool functionality.
**Example:** "What's my current order status?"
The assistant analyzes the request and determines which tool to use based on your tool descriptions.
The AI extracts required parameters from the conversation context:
* User-provided information
* Previous conversation context
* Assistant's knowledge base
Your tool endpoint receives a request with the extracted parameters.
Your backend processes the request:
* Validates parameters
* Performs necessary operations
* Queries databases or APIs
* Generates response data
Your tool returns structured data to the AI assistant.
The assistant incorporates the tool's output into a natural conversational response to the user.
**Example:** "I checked your order status - it's currently being prepared and will ship tomorrow!"
## Best Practices
**Create Focused Tools:**
* Each tool should do one thing well
* Avoid combining too many functions
* Make tools reusable across assistants
**Clear Descriptions:**
* Explain exactly what the tool does
* Include when to use it
* Mention limitations if any
**Smart Parameters:**
* Only request essential information
* Use descriptive names and descriptions
* Provide sensible defaults when possible
**Graceful Failures:**
* Return helpful error messages
* Guide the AI on what went wrong
* Suggest alternative actions
**Validation:**
* Validate all inputs
* Check for required parameters
* Verify data types and formats
**Timeout Management:**
* Set reasonable timeouts
* Handle slow responses gracefully
* Provide status updates for long operations
**Authentication:**
* Use secure headers for API keys
* Implement proper authorization
* Validate requests server-side
**Data Protection:**
* Never expose sensitive data unnecessarily
* Sanitize inputs and outputs
* Follow data privacy regulations
**Rate Limiting:**
* Implement rate limits
* Handle quota exhaustion
* Monitor tool usage
**Before Deploying:**
* Test all parameter combinations
* Verify error handling
* Check edge cases
**Monitor Performance:**
* Track response times
* Log errors and failures
* Analyze usage patterns
**Iterate:**
* Gather feedback from conversations
* Refine tool descriptions
* Optimize parameters based on actual usage
## Common Use Case Examples
### Example 1: Customer Lookup Tool
```
{
"name": "get_customer_info",
"description": "Retrieves customer information including name, email, phone, and account status. Use this when you need to look up customer details during a call.",
"parameters": [
{
"name": "customer_id",
"type": "string",
"description": "The unique customer ID or phone number",
"required": true
}
]
}
```
### Example 2: Appointment Booking Tool
```
{
"name": "book_appointment",
"description": "Books an appointment for a customer at the specified date and time. Use this when a customer wants to schedule or reschedule an appointment.",
"parameters": [
{
"name": "customer_id",
"type": "string",
"description": "The customer's unique identifier",
"required": true
},
{
"name": "appointment_date",
"type": "string",
"description": "Preferred date in YYYY-MM-DD format",
"required": true
},
{
"name": "appointment_time",
"type": "string",
"description": "Preferred time in HH:MM format (24-hour)",
"required": true
},
{
"name": "service_type",
"type": "string",
"description": "Type of service requested",
"required": false
}
]
}
```
### Example 3: Order Status Tool
```
{
"name": "check_order_status",
"description": "Checks the current status and tracking information for a customer's order. Use when customers inquire about their order.",
"parameters": [
{
"name": "order_id",
"type": "string",
"description": "The order number or ID",
"required": true
}
]
}
```
## Troubleshooting
**Possible Causes:**
* Description isn't clear enough for AI to understand when to use it
* Parameters aren't well-defined
* Tool name is ambiguous
**Solutions:**
* Improve tool description with specific use cases
* Add examples in parameter descriptions
* Test with different conversation scenarios
* Ensure tool name reflects its purpose
**Possible Causes:**
* Parameter descriptions are vague
* Required information not available in conversation
* Type mismatches
**Solutions:**
* Make parameter descriptions more specific
* Mark optional parameters appropriately
* Provide format examples in descriptions
* Ensure conversation flow gathers needed info
**Possible Causes:**
* Backend endpoint not responding
* Authentication failures
* Invalid parameter values
**Solutions:**
* Verify endpoint URL is correct
* Check header authentication
* Implement proper error responses
* Add logging to debug issues
## Next Steps
Create test conversations to verify your tools work as expected
Track tool usage and response times in your analytics
Add more tools to handle additional use cases
Refine based on how the AI uses your tools in practice
Tools are powerful but should be used thoughtfully. Start with essential integrations and expand based on real needs and usage patterns.
* **Update Assistant**: Click **Update** to save changes
## Tool Execution Flow
Understanding how tools work during conversations:
During a call, the user asks something that requires tool functionality.
**Example:** "What's my current order status?"
The assistant analyzes the request and determines which tool to use based on your tool descriptions.
The AI extracts required parameters from the conversation context:
* User-provided information
* Previous conversation context
* Assistant's knowledge base
Your tool endpoint receives a request with the extracted parameters.
Your backend processes the request:
* Validates parameters
* Performs necessary operations
* Queries databases or APIs
* Generates response data
Your tool returns structured data to the AI assistant.
The assistant incorporates the tool's output into a natural conversational response to the user.
**Example:** "I checked your order status - it's currently being prepared and will ship tomorrow!"
## Best Practices
**Create Focused Tools:**
* Each tool should do one thing well
* Avoid combining too many functions
* Make tools reusable across assistants
**Clear Descriptions:**
* Explain exactly what the tool does
* Include when to use it
* Mention limitations if any
**Smart Parameters:**
* Only request essential information
* Use descriptive names and descriptions
* Provide sensible defaults when possible
**Graceful Failures:**
* Return helpful error messages
* Guide the AI on what went wrong
* Suggest alternative actions
**Validation:**
* Validate all inputs
* Check for required parameters
* Verify data types and formats
**Timeout Management:**
* Set reasonable timeouts
* Handle slow responses gracefully
* Provide status updates for long operations
**Authentication:**
* Use secure headers for API keys
* Implement proper authorization
* Validate requests server-side
**Data Protection:**
* Never expose sensitive data unnecessarily
* Sanitize inputs and outputs
* Follow data privacy regulations
**Rate Limiting:**
* Implement rate limits
* Handle quota exhaustion
* Monitor tool usage
**Before Deploying:**
* Test all parameter combinations
* Verify error handling
* Check edge cases
**Monitor Performance:**
* Track response times
* Log errors and failures
* Analyze usage patterns
**Iterate:**
* Gather feedback from conversations
* Refine tool descriptions
* Optimize parameters based on actual usage
## Common Use Case Examples
### Example 1: Customer Lookup Tool
```
{
"name": "get_customer_info",
"description": "Retrieves customer information including name, email, phone, and account status. Use this when you need to look up customer details during a call.",
"parameters": [
{
"name": "customer_id",
"type": "string",
"description": "The unique customer ID or phone number",
"required": true
}
]
}
```
### Example 2: Appointment Booking Tool
```
{
"name": "book_appointment",
"description": "Books an appointment for a customer at the specified date and time. Use this when a customer wants to schedule or reschedule an appointment.",
"parameters": [
{
"name": "customer_id",
"type": "string",
"description": "The customer's unique identifier",
"required": true
},
{
"name": "appointment_date",
"type": "string",
"description": "Preferred date in YYYY-MM-DD format",
"required": true
},
{
"name": "appointment_time",
"type": "string",
"description": "Preferred time in HH:MM format (24-hour)",
"required": true
},
{
"name": "service_type",
"type": "string",
"description": "Type of service requested",
"required": false
}
]
}
```
### Example 3: Order Status Tool
```
{
"name": "check_order_status",
"description": "Checks the current status and tracking information for a customer's order. Use when customers inquire about their order.",
"parameters": [
{
"name": "order_id",
"type": "string",
"description": "The order number or ID",
"required": true
}
]
}
```
## Troubleshooting
**Possible Causes:**
* Description isn't clear enough for AI to understand when to use it
* Parameters aren't well-defined
* Tool name is ambiguous
**Solutions:**
* Improve tool description with specific use cases
* Add examples in parameter descriptions
* Test with different conversation scenarios
* Ensure tool name reflects its purpose
**Possible Causes:**
* Parameter descriptions are vague
* Required information not available in conversation
* Type mismatches
**Solutions:**
* Make parameter descriptions more specific
* Mark optional parameters appropriately
* Provide format examples in descriptions
* Ensure conversation flow gathers needed info
**Possible Causes:**
* Backend endpoint not responding
* Authentication failures
* Invalid parameter values
**Solutions:**
* Verify endpoint URL is correct
* Check header authentication
* Implement proper error responses
* Add logging to debug issues
## Next Steps
Create test conversations to verify your tools work as expected
Track tool usage and response times in your analytics
Add more tools to handle additional use cases
Refine based on how the AI uses your tools in practice
Tools are powerful but should be used thoughtfully. Start with essential integrations and expand based on real needs and usage patterns.